Introduction
Lemmy is a selfhosted, federated social link aggregation and discussion forum. It consists of many different communities which are focused on different topics. Users can post text, links or images and discuss it with others. Voting helps to bring the most interesting items to the top. There are strong moderation tools to keep out spam and trolls. All this is completely free and open, not controlled by any company. This means that there is no advertising, tracking, or secret algorithms.
Federation is a form of decentralization. Instead of a single central service that everyone uses, there are multiple services that any number of people can use.
A Lemmy website can operate alone. Just like a traditional website, people sign up on it, post messages, upload pictures and talk to each other. Unlike a traditional website, Lemmy instances can interoperate, letting their users communicate with each other; just like you can send an email from your Gmail account to someone from Outlook, Fastmail, Proton Mail, or any other email provider, as long as you know their email address, you can mention or message anyone on any website using their address.
Lemmy uses a standardized, open protocol to implement federation which is called ActivityPub. Any software that likewise implements federation via ActivityPub can seamlessly communicate with Lemmy, just like Lemmy instances communicate with one another.
The fediverse (“federated universe”) is the name for all instances that can communicate with each other over ActivityPub and the World Wide Web. That includes all Lemmy servers, but also other implementations:
In practical terms: Imagine if you could follow a Facebook group from your Reddit account and comment on its posts without leaving your account. If Facebook and Reddit were federated services that used the same protocol, that would be possible. With a Lemmy account, you can communicate with any other compatible instance, even if it is not running on Lemmy. All that is necessary is that the software support the same subset of the ActivityPub protocol.
Unlike proprietary services, anyone has the complete freedom to run, examine, inspect, copy, modify, distribute, and reuse the Lemmy source code. Just like how users of Lemmy can choose their service provider, you as an individual are free to contribute features to Lemmy or publish a modified version of Lemmy that includes different features. These modified versions, also known as software forks, are required to also uphold the same freedoms as the original Lemmy project. Because Lemmy is libre software that respects your freedom, personalizations are not only allowed but encouraged.
You can contribute to this documentation in the git repository.
This page is adapted from Mastodon documentation under CC BY-SA 4.0.
Getting Started
Choosing an Instance
If you are used to sites like Reddit, then Lemmy works in a fundamentally different way. Instead of a single website like reddit.com, there are many different websites (called instances). These are operated by different people, have different topics and rules. Nevertheless, posts created in one instance can directly be seen by users who are registered on another. Its basically like email, but for social media.
This means before using Lemmy and registering an account, you need to pick an instance. For this you can browse the instance list and look for one that matches your topics of interest. You can also see if the rules match your expectations, and how many users there are. It is better to avoid very big or very small instances. But don’t worry too much about this choice, you can always create another account on a different instance later.
Registration
Once you choose an instance, it’s time to create your account. To do this, click sign up in the top right of the page, or click the top right button on mobile to open a menu with sign up link.
On the signup page you need to enter a few things:
- Username: How do you want to be called? This name can not be changed and is unique within an instance. Later you can also set a displayname which can be freely changed. If your desired username is taken, consider choosing a different instance where it is still available.
- Email: Your email address. This is used for password resets and notifications (if enabled). Providing an email address is usually optional, but admins may choose to make it mandatory. In this case you will have to wait for a confirmation mail and click the link after completing this form.
- Password: The password for logging in to your account. Make sure to choose a long and unique password which isn’t used on any other website.
- Verify password: Repeat the same password from above to ensure that it was entered correctly.
There are also a few optional fields, which you may need to fill in depending on the instance configuration:
- Question/Answer: Instance admins can set an arbitrary question which needs to be answered in order to create an account. This is often used to prevent spam bots from signing up. After submitting the form, you will need to wait for some time until the answer is approved manually before you can login.
- Code: A captcha which is easy to solve for humans but hard for bots. Enter the letters and numbers that you see in the text box, ignoring uppercase or lowercase. Click the refresh button if you are unable to read a character. The play button plays an audio version of the captcha.
- Show NSFW content: Here you can choose if content that is “not safe for work” (or adult-only) should be shown.
When you are done, press the sign up button.
It depends on the instance configuration when you can login and start using the account. In case the email is mandatory, you need to wait for the confirmation email and click the link first. In case “Question/Answer” is present, you need to wait for an admin to manually review and approve your registration. If you have problems with the registration, try to get in contact with the admin for support. You can also choose a different instance to sign up if your primary choice does not work.
Following Communities
After logging in to your new account, its time to follow communities that you are interested in. For this you can click on the communities link at the top of the page (on mobile, you need to click the menu icon on the top right first). You will see a list of communities which can be filtered by subscribed, local or all. Local communities are those which are hosted on the same site where you are signed in, while all also contains federated communities from other instances. In any case you can directly subscribe to communities with the right-hand subscribe link. Or click on the community name to browse the community first, see what its posted and what the rules are before subscribing.
Another way to find communities to subscribe to is by going to the front page and browsing the posts. If there is something that interests you, click on the post title to see more details and comments. Here you can subscribe to the community in the right-hand sidebar, or by clicking the “sidebar” button on mobile.
These previous ways will only show communities that are already known to the instance. Especially if you joined a small or inactive Lemmy instance, there will be few communities to discover. You can find more communities by browsing different Lemmy instances, or using the Lemmy Explorer. When you found a community that you want to follow, enter its URL (e.g. https://feddit.org/c/main) or the identifier (e.g. !main@feddit.org) into the search field of your own Lemmy instance. Lemmy will then fetch the community from its original instance, and allow you to interact with it. The same method also works to fetch users, posts or comments from other instances.
Setting up Your Profile
Before you start posting, its a good idea to provide some details about yourself. Open the top-right menu and go to “settings”. Here the following settings are available for your public profile:
- Displayname: An alternative username which can be changed at any time
- Bio: Long description of yourself, can be formatted with Markdown
- Matrix User: Your username on the decentralized Matrix chat
- Avatar: Profile picture that is shown next to all your posts
- Banner: A header image for your profile page
On this page you can also change the email and password. Additionally there are many other settings available, which allow customizing of your browsing experience:
- Blocks (tab at top of the page): Here you can block users and communities, so that their posts will be hidden.
- Interface language: Which language the user interface should use.
- Languages: Select the languages that you speak to see only content in these languages. This is a new feature and many posts don’t specify a language yet, so be sure to select “Undetermined” to see them.
- Theme: You can choose between different color themes for the user interface. Instance admins can add more themes.
- Type: Which timeline you want to see by default on the front page; only posts from communities that you subscribe to, posts in local communities, or all posts including federated.
- Sort type: How posts and comments should be sorted by default. See Votes and Ranking for details.
- Show NSFW content: Whether or not you want to see content that is “not safe for work” (or adult-only).
- Show Scores: Whether the number of upvotes and downvotes should be visible.
- Show Avatars: Whether profile pictures of other users should be shown.
- Bot Account: Enable this if you are using a script or program to create posts automatically
- Show Bot Accounts: Disable this to hide posts that were created by bot accounts.
- Show Read Posts: If this is disabled, posts that you already viewed are not shown in listings anymore. Useful if you want to find new content easily, but makes it difficult to follow ongoing discussion under existing posts.
- Show Notifications for New Posts: Enable this to receive a popup notification for each new post that is created.
- Send notifications to Email: Enable to receive notifications about new comment replies and private messages to your email address.
Start Posting
Finally its time to start posting! To do this it is always a good idea to read the community rules in the sidebar (below the Subscribe button). When you are ready, go to a post and type your comment in the box directly below for a top-level reply. You can also write a nested reply to an existing comment, by clicking the left-pointing arrow.
Other than commenting on existing posts, you can also create new posts. To do this, click the button Create a post in the sidebar. Here you can optionally supply an external link or upload an image. The title field is mandatory and should describe what you are posting. The body is again optional, and gives space for long texts. You can also embed additional images here. The Community dropdown below allows choosing a different community to post in. With NSFW, posts can be marked as “not safe for work”. Finally you can specify the language that the post is written in, and then click on Create.
One more possibility is to write private messages to individual users. To do this, simply visit a user profile and click Send message. You will be notified about new private messages and comment replies with the bell icon in the top right.
Media
Text
The main type of content in Lemmy is text which can be formatted with Markdown. Refer to the table below for supported formatting rules. The Lemmy user interface also provides buttons for formatting, so it’s not necessary to remember all of it. You can also follow the interactive CommonMark tutorial to get started.
| Type | Or | … to Get |
|---|---|---|
| *Italic* | _Italic_ | Italic |
| **Bold** | __Bold__ | Bold |
| # Heading 1 | Heading 1 ========= |
Heading 1 |
| ## Heading 2 | Heading 2 ——— |
Heading 2 |
| [Link](http://a.com) | [Link][1] ⋮ [1]: http://b.org | Link |
|  | ![Image][1] ⋮ [1]: http://url/b.jpg |  |
| Example^[Footnote] | Example[1] ⋮
| |
| > Blockquote |
Blockquote | |
| * List * List * List | - List - List - List |
|
| 1. One 2. Two 3. Three | 1) One 2) Two 3) Three |
|
| Horizontal Rule -– | Horizontal Rule *** | Horizontal Rule |
| `Inline code` with backticks | Inline code with backticks | |
| ``` # code block print ‘3 backticks or’ print ‘indent 4 spaces’ ``` | ····# code block ····print ‘3 backticks or’ ····print ‘indent 4 spaces’ |
|
| ::: spoiler hidden or nsfw stuff a bunch of spoilers here ::: | hidden or nsfw stuffa bunch of spoilers here | |
| Some ~subscript~ text | Some subscript text | |
| Some ^superscript^ text | Some superscript text | |
| ~~Strikethrough~~ | Some | |
| {Ruby|text} | Ruby |
Images and Video
Lemmy also allows sharing of images and videos. To upload an image, go to the Create post page and click the little image icon under the URL field. This allows you to select a local image. If you made a mistake, a popup message allows you to delete the image. The same image button also allows uploading of videos in .gif format. Instead of uploading a local file, you can also simply paste the URL of an image or video from another website.
Note that this functionality is not meant to share large images or videos, because that would require too many server resources. Instead, upload them on another platform like PeerTube or Pixelfed, and share the link on Lemmy.
Torrents
Since Lemmy doesn’t host large videos or other media, users can share files using BitTorrent links. In BitTorrent, files are shared not by a single user, but by many users at the same time. This makes file sharing efficient, fast, and reliable, as long as several sources are sharing the files.
Lemmy supports posting torrent magnet links (links that start with magnet:) in the post URL field, or as Markdown links within comments. You can get a magnet link by clicking copy magnet link in your torrent app.
With this, Lemmy can serve as an alternative to centralized media-centric services like YouTube and Spotify.
How to Watch Torrents
Beginner
To easily stream videos and audio on Lemmy, you can use any of the following apps. After clicking on a torrent link in Lemmy, a dialog will pop up asking you to open the link in the app.
- Stremio (Desktop, Android)
- WebTorrent Desktop (Desktop)
- Popcorn Time (Desktop)
- xTorrent (Android)
Advanced
For those who would like to help share files, you can use any of the following torrent clients:
- qBittorrent (Desktop)
- Deluge (Desktop)
- Transmission (Desktop)
- LibreTorrent (Android)
Many of these support streaming videos. To do this, make sure you check sequential download, wait for enough of the download to complete, then click to open the video file.
If you’d like, you can also set up a media server to view this content on any device. Some good options are:
- Jellyfin (Movies, TV, Music, Audiobooks)
- Navidrome (Music)
- audiobookshelf (Audiobooks)
Votes and Ranking
Posts
Lemmy uses a voting system to sort post listings. On the left side of each post there are up and down arrows, which let you upvote or downvote it. You can upvote posts that you like so that more users will see them, or downvote posts so that they are less likely to be seen. Each post receives a score which is the number of upvotes minus the number of downvotes.
Sorting Posts
When browsing the front page or a community, you can choose between the following sort types for posts:
| Sort | Description |
|---|---|
| Active (default) | Calculates a rank based on the score and time of the latest comment, with decay over time |
| Hot | Like active, but uses time when the post was published |
| Scaled | Like hot, but gives a boost to less active communities |
| Controversial | Shows most controversial posts (many up and downvotes) |
| New | Shows most recent posts first |
| Old | Shows oldest posts first |
| Most Comments | Shows posts with highest number of comments first |
| New Comments | Bumps posts to the top when they are created or receive a new reply, analogous to the sorting of traditional forums |
| Top Day | Highest scoring posts during the last 24 hours |
| Top Week | Highest scoring posts during the last 7 days |
| Top Month | Highest scoring posts during the last 30 days |
| Top Year | Highest scoring posts during the last 12 months |
| Top All Time | Highest scoring posts of all time |
Comments
Comments are by default arranged in a hierarchy which shows at a glance who it is replying to. Top-level comments which reply directly to a post are on the very left, not indented at all. Comments that are responding to top-level comments are indented one level and each further level of indentation means that the comment is deeper in the conversation. With this layout, it is always easy to see the context for a given comment, by simply scrolling up to the next comment which is indented one level less.
Sorting Comments
Comments can be sorted in the following ways. These all keep the indentation intact, so only replies to the same parent are shuffled around.
| Sort | Description |
|---|---|
| Hot (default) | Equivalent to the Hot sort for posts |
| Top | Shows comments with highest score first |
| New | Shows most recent comments first |
| Old | Shows oldest comments first |
Additionally there is a sort option Chat. This eliminates the hierarchy, and puts all comments on the top level, with newest comments shown at the top. It is useful to see new replies at any point in the conversation, but makes it difficult to see the context.
The ranking algorithm is described in detail here.
Vote Privacy
Lemmy attempts to limit the visibility of votes to protect user privacy. But due to the way Lemmy works, votes cannot be completely private. Instance admins can see the names of everyone who voted on a given post or comment, and community moderators can see the names for the communities they moderate. This helps to fight against vote manipulation. Additionally, individual votes are federated over ActivityPub together with the corresponding username. This means that other federated platforms can freely choose how to display vote information, even going as far as publicly displaying individual votes.
Moderation
The internet is full of bots, trolls and other malicious actors. Sooner or later they will post unwanted content to any website that is open to the public. It is the task of administrators and moderators to remove such unwanted content. Lemmy provides many tools for this, from removing individual posts and issuing temporary bans, to removing all content submitted by an offending user.
Moderation in Lemmy is divided between administrators (admins) and moderators (mods). Admins are responsible for the entire instance, and can take action on any content. They are also the only ones who can completely ban users. In contrast, moderators are only responsible for a single community. Whereas admins can ban a user from the entire instance, mods can only ban them from their community.
The most important thing that normal users can do if they notice a rule-breaking post is to use the report function. If you notice such a post, click the flag icon to notify mods and admins. This way they can take action quickly and remove the offending content. To find out about removals and other mod actions, you can use the mod log which is linked at the bottom of the page. In some cases there may be content that you personally dislike, but which doesn’t violate any rules. For this, there is a block function which hides all posts from a given user or community.
Rules
Each instance has a set of rules to let users know which content is allowed or not. These rules can be found in the sidebar and apply to all local communities on that instance. Some communities may have their own rules in their respective sidebars, which apply in addition to the instance rules.
Because Lemmy is decentralized, there is no single moderation team for the platform, nor any platform-wide rules. Instead each instance is responsible to create and enforce its own moderation policy. This means that two Lemmy instances can have rules that completely disagree or even contradict. This can lead to problems if they interact with each other, because by default federation is open to any instance that speaks the same protocol. To handle such cases, administrators can choose to block federation with specific instances. To be even safer, they can also choose to be federated only with instances that are allowed explicitly.
How to Moderate
To get moderator powers, you either need to create a new community, or be appointed by an existing moderator. Similarly, to become an admin, you need to create a new instance, or be appointed by an existing instance admin. Community moderation can be done over federation, you don’t need to be registered on the same instance where the community is hosted. To be an instance administrator, you need an account on that specific instance. Admins and moderators are organized in a hierarchy, where the user who is listed first has the power to remove admins or mods who are listed later.
All moderation actions are taken in the context menu of posts or comments. Click the three dot button to expand available mod actions, as shown in the screenshot below. All actions can be reverted in the same way.

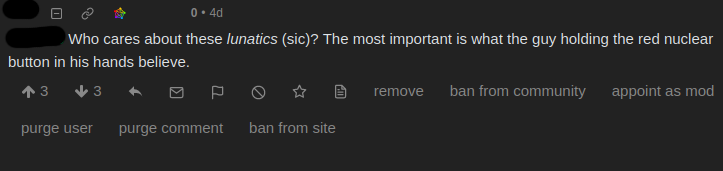
| Action | Result | Permission level |
|---|---|---|
| Lock | Prevents making new comments under the post | Moderator |
| Sticky (Community) | Pin the publication to the top of the community listing | Moderator |
| Sticky (Local) | Pin the publication to the top of the front page | Admin |
| Remove | Delete the post | Moderator |
| Ban from community | Ban the user from interacting with the community, but they can still use the rest of the site. There is also an option to remove all existing posts. | Moderator |
| Appoint as mod | Gives the user moderator status | Moderator |
| Ban from site | Completely bans the account, so it cannot log in or interact at all. There is also an option to remove all existing posts. | Admin |
| Purge user | Completely delete the user, including all posts and uploaded media. Use with caution. | Admin |
| Purge post/comment | Completely delete the post, including attached media. | Admin |
| Appoint as admin | Gives the user administrator status | Admin |
Censorship resistance
Today’s social media landscape is extremely centralized. The vast majority of users are concentrated on only a handful of platforms like Facebook, Reddit or Twitter. All of these are maintained by large corporations that are subject to profit motive and United States law. In recent years these platforms have increasingly censored users and entire communities, often with questionable justifications. It is only natural that those who are affected by this search for alternatives. This document is intended to help with the evaluation.
For this purpose we will consider as censorship anything that prevents a person from expressing their opinion, regardless of any moral considerations. All the options explained here also have legitimate uses, such as deleting spam. Nevertheless it is important for users to understand why their posts are getting removed and how to avoid it.
The first and most common source of censorship in this sense is the admin of a given Lemmy instance. Due to the way federation works, an admin has complete control over their instance, and can arbitrarily delete content or ban users. The moderation log helps to provide transparency into such actions.
The second source of censorship is through legal means. This often happens for copyright violation, but can also be used for other cases. What usually happens in this case is that the instance admin receives a takedown notice from the hosting provider or domain registrar. If the targeted content is not removed within a few days, the site gets taken down. The only way to avoid this is to choose the hosting company and country carefully, and avoid those which might consider the content as illegal.
Another way to censor is through social pressure on admins. This can range from spamming reports for unwanted content, to public posts from influential community members demanding to take certain content down. Such pressure can keep mounting for days or weeks, making it seem like everyone supports these demands. But in fact it is often nothing more than a vocal minority. It is the task of admins to gauge the true opinion of their community. Community members should also push back if a minority tries to impose its views on everyone else.
All of this shows that it is relatively easy to censor a single Lemmy instance. Even a group of instances can be censored if they share the same admin team, hosting infrastructure or country. Here it is important that an admin can only censor content on their own instance, or communities which are hosted on his instance. Other instances will be unaffected. So if there is a problem with censorship, it can always be solved by using a different Lemmy instance, or creating a new one.
But what if the goal was to censor the entire Lemmy network? This is inherently difficult because there is no single entity which has control over all instances. The closest thing to such an entity are the developers, because they can make changes to the code that all the instances run. For example, developers could decide to implement a hardcoded block for certain domains, so that they can’t federate anymore. However, changes need to be released and then installed by instance admins. Those who are affected would have no reason to upgrade. And because the code is open source, they could publish a forked software version without these blocks. So the effect would be very limited, but it would split the project and result in loss of reputation for the developers. This is probably the reason why it has never happened on any Fediverse platform.
Lastly it might be possible to abuse software vulnerabilities for network-wide censorship. Imagine a bug in Lemmy or in the underlying software stack which allows the attacker to delete arbitrary content. This could remain undetected for a while if used sparingly, but would certainly be discovered after some time. And experience has shown that such critical flaws are fixed very quickly in open source software. It is also highly unlikely that critical vulnerabilities be present in multiple different Fediverse platforms at the same time.
In conclusion, the best way to avoid censorship on Lemmy is through the existence of many independent instances. These should have different admins, different hosting providers and be located in different countries. Additionally users should follow the development process to watch for changes that might create a centralized point of control for all instances. Based on this explanation it should be clear that censorship on Lemmy is difficult, and can always be circumvented. This is in contrast to centralized platforms like Facebook or Reddit. They are not open source and can’t be self-hosted, so it is necessary to switch to an entirely different platform to avoid censorship. And due to lack of federation, such a switch means losing contact with users who decide to stay on the censored platform.
Fediverse interaction
As mentioned in the introduction, Lemmy users and non-Lemmy users from the fediverse can communicate between each other, too. The way Lemmy users’ activity is handled by non-Lemmy instances depends on the software running on the latter. If you are interested in that, you should read the documentation of the software run by the non-Lemmy instance in question. Here, we only focus on how non-Lemmy users’ activity is handled by Lemmy instances. There are only a few things to keep in mind:
- Many fediverse-compatible social media have no notion of “group”. These display Lemmy communities as single users, e.g.
@meta@sopuli.xyzrather than!meta@sopuli.xyz. Just open the community from your non-Lemmy instance to check the correct handle. - Users of link aggregators like Lemmy tend not to use hashtags and mentions, so consider limiting yourself to the bare minimum when posting or commenting, even if the rules of the Lemmy community/instance in question do not mention it.
Follow a Lemmy community
You can freely follow any Lemmy community from non-Lemmy software.
Post in a Lemmy community
To post in a Lemmy community from a non-Lemmy fediverse account, simply create a post following these rules:
- If your non-Lemmy software does not feature a “title” field for posts, the first line (i.e., the content before the first newline character) should be the desired title for your Lemmy post. Only its first 100 characters will be shown, while the rest will be ignored.
- The post visibility must be “Public” or similar.
- You must mention the Lemmy community’s full handle.
- Any other mentions should be placed after the one involving the target Lemmy community.
- Media should have alt text, as this is the same alt text that will be shown in Lemmy.
If your post follows these rules, it should be automatically reposted by the Lemmy community almost immediately. Unlike media, links cannot be attached, but you can simply insert them within the content of your post.
Comment under a Lemmy post
Comments to a Lemmy post (or to one of its comments) will be visible on Lemmy.
Troubleshooting
If your message does not appear in the community, you should:
- Wait a few minutes.
- Double-check the rules mentioned above.
- Ensure the Lemmy instance has not defederated from your non-Lemmy instance (or the other way around). For example, the Lemmy administrator might have disabled federation with all instances (except for a limited whitelist), or they could have blacklisted the non-Lemmy instance specifically. To check this, Lemmy offers an “Instances” button in its footer. The software run by the non-Lemmy instance probably offers a similar functionality.
Other Features
Theming
Users can choose between a number of built-in color themes. Admins can also provide additional themes and set them as default.
Easy to Install, Low Hardware Requirements
Lemmy is written in Rust, which is an extremely fast language. This is why it has very low hardware requirements. It can easily run on a Raspberry Pi or similar low-powered hardware. This makes it easy to administrate and keeps costs low.
Backup of User Settings
Users can create a backup of their account data on the /settings page and store it locally. This can help in case the Lemmy instance goes down or the account gets banned. The backup includes settings like display name, bio, sort options as well as followed communities, saved posts, blocked communities and more. After registering on a new Lemmy instance, the backup file can be imported in the same place to restore the data. Restoring overwrites all the existing settings like bio and sort options. Follows and blocks on the other hand are additive, existing follows or blocks are kept unchanged. It is save to edit the backup file with a text editor to remove specific lines and avoid importing them (just be sure it is valid json before uploading).
Language Tags
Lemmy instances and communities can specify which languages can be used for posting. Consider an instance aimed at Spanish users, it would limit the posting language to Spanish so that other languages can’t be used. Or an international instance which only allows languages that the admin team understands. Community languages work in the same way, and are restricted to a subset of the instance languages. By default, all languages are allowed (including undefined).
Users can also specify which languages they speak, and will only see content in those languages. Lemmy tries to smartly select a default language for new posts if possible. Otherwise you have to specify the language manually.
Lemmy as a Blog
Lemmy can also function as a blogging platform. Doing this is as simple as creating a community and enabling the option “Only moderators can post to this community”. Now only you and other people that you invite can create posts, while everyone else can comment. Like any Lemmy community, it is also possible to follow from other Fediverse platforms and over RSS. For advanced usage, it is even possible to use the API and create a different frontend which looks more blog-like.
History of Lemmy
The idea to make Lemmy was a combination of factors.
Open source developers like myself have long watched the rise of the “Big Five”, the US tech giants that have managed to capture nearly all the world’s everyday communication into their hands. We’ve been asking ourselves why people have moved away from content-focused sites, and what we can do to subvert this trend, in a way that is easily accessible to a non-tech focused audience.
The barriers to entry on the web are much lower than say in the physical world: all it takes is a computer and some coding knowhow… yet the predominant social media firms have been able to stave off competition for at least two reasons: their sites are easy to use, and they have huge numbers of users already (the “first mover” advantage). The latter is more important; if you’ve ever tried to get someone to use a different chat app, you’ll know what I mean.
Now I loved early Reddit, not just for the way that it managed to put all the news for the communities and topics I wanted to see in a single place, but for the discussion trees behind every link posted. I still have many of these saved, and have gained so much more from the discussion behind the links, than I have from the links themselves. In my view, its the community-focused, tree-like discussions, as well as the ability to make, grow, and curate communities, that has made Reddit the 5th most popular site in the US, and where so many people around the world get their news.
But that ship sailed years ago; the early innovative spirit of Reddit left with Aaron Swartz: its libertarian founders have allowed some of the most racist and sexist online communities to fester on Reddit for years, only occasionally removing them when community outcry reaches a fever pitch. Reddit closed its source code years ago, and the Reddit redesign has become a bloated anti-privacy mess.
Its become absorbed into that silicon valley surveillance-capitalist machine that commodifies users to sell ads and paid flairs, and propagandizes pro-US interests above all. Software technology being one of the last monopoly exports the US has, it would be naive to think that one of the top 5 most popular social media sites, where so many people around the world get their news, would be anything other than a mouthpiece for the interests of those same US coastal tech firms.
Despite the conservative talking point that big tech is dominated by “leftist propaganda”, it is liberal, and pro-US, not left (leftism referring to the broad category of anti-capitalism). Reddit has banned its share of leftist users and communities, and the Reddit admins via announcement posts repeatedly vilify the US’s primary foreign-policy enemies as having “bot campaigns”, and “manipulating Reddit”, yet the default Reddit communities (/r/news, /r/pics, etc), who share a small number of moderators, push a line consistent with US foreign-policy interests. The aptly named /r/copaganda subreddit has exposed the pro-police propaganda that always seems to hit Reddit’s front page in the wake of every tragedy involving US police killing the innocent (or showing police kissing puppies, even though US police kill ~ 30 dogs every day, which researchers have called a “noted statistical phenomenon”).
We’ve also seen a rise in anti-China posts that have hit Reddit lately, and along with that comes anti-chinese racism, which Reddit tacitly encourages. That western countries are seeing a rise in attacks against Asian-Americans, just as some of the perpetrators of several hate-crimes against women were found to be Redditors active in mens-rights Reddit communities, is not lost on us, and we know where these tech companies really stand when it comes to violence and hate speech. Leftists know that our position on these platforms is tenuous at best; we’re currently tolerated, but that will not always be the case.
The idea for making a Reddit alternative seemed pointless, until Mastodon (a federated twitter alternative), started becoming popular. Using Activitypub (a protocol / common language that social media services can use to speak to each other), we finally have a solution to the “first mover” advantage: now someone can build or run a small site, but still be connected to a wider universe of users.
Nutomic and I originally made Lemmy to fill the role as a federated alternative to Reddit, but as it grows, it has the potential become a main source of news and discussion, existing outside of the US’s jurisdictional domain and control.
Administration
Information for Lemmy instance admins, and those who want to run a server.
If you have any problems in the installation, you can ask for help in !lemmy_support or Matrix. Do not open Github issues for support.
Install
Official/Supported methods
Lemmy has two primary installation methods:
We recommend using Ansible, because it simplifies the installation and also makes updating easier.
Lemmy uses roughly 150 MB of RAM in the default Docker installation. CPU usage is negligible.
Managed Hostings
Other installation methods
⚠️ Under your own risk.
In some cases, it might be necessary to use different installation methods.
- From Scratch
- YunoHost (source code)
- On Amazon Web Services (AWS)
- Nomad (see this external repo for examples)
You could use any other reverse proxy
An Example Caddy configuration.
Lemmy components
Lemmy-ui
Lemmy-ui is the main frontend for Lemmy. It consists of an expressjs based server-side process (necessary for SSR) and client code which run in the browser. It does not use a lot of resources and will happily run on quite low powered servers.
Lemmy_server
Lemmy_server is the backend process, which handles:
- Incoming HTTP requests (both from Lemmy clients and incoming federation from other servers)
- Outgoing federation
- Scheduled tasks (most notably, constant hot rank calculations, which keep the front page fresh)
Pict-rs
Pict-rs is a service which does image processing. It handles user-uploaded images as well as downloading thumbnails for external images.
Install with Docker
Make sure you have both docker and docker-compose(>=2.0) installed. On Ubuntu, just run apt install docker-compose-v2 docker.io. On Debian, you need to install Docker using their official installation instructions and custom apt repo.
Create a folder for the lemmy files. the location doesnt matter. You can put this anywhere you want, for example under /srv/:
mkdir lemmy
cd lemmy
Then download default config files:
wget https://raw.githubusercontent.com/LemmyNet/lemmy-docs/main/assets/docker-compose.yml
wget https://raw.githubusercontent.com/LemmyNet/lemmy-ansible/main/examples/config.hjson -O lemmy.hjson
wget https://raw.githubusercontent.com/LemmyNet/lemmy-ansible/main/templates/nginx_internal.conf
wget https://raw.githubusercontent.com/LemmyNet/lemmy-ansible/main/files/proxy_params
Edit docker-compose.yml and lemmy.hjson to replace all occurrences of {{ domain }} with your actual Lemmy domain, {{ postgres_password }} with a random password.
Also edit nginx_internal.conf and replace {{ nginx_internal_resolver }} with 127.0.0.11 (use 10.89.0.1 for RedHat distributions).
If you’d like further customization, have a look at the config file named lemmy.hjson, and adjust it accordingly.
Database tweaks
To optimize your database, add this file.
You can input your system specs, using this tool: https://pgtune.leopard.in.ua/
wget https://raw.githubusercontent.com/LemmyNet/lemmy-ansible/main/examples/customPostgresql.conf
Folder permissions
Set the correct permissions for pictrs folder:
mkdir -p volumes/pictrs
sudo chown -R 991:991 volumes/pictrs
Finally, run:
docker compose up -d
lemmy-ui is accessible on the server at http://localhost:{{ lemmy_port }}
Reverse Proxy / Webserver
Here’s an optional nginx reverse proxy template, which you can place in /etc/nginx/sites-enabled
Alternatively, you can use any other web server such as caddy as a simple reverse proxy.
Be sure to edit the {{ }} to match your domain and port.
If you’re using this, you will need to set up Let’s Encrypt. See those instructions below.
wget https://raw.githubusercontent.com/LemmyNet/lemmy-ansible/main/templates/nginx.conf
If you’ve set up Let’s Encrypt and your reverse proxy, you can go to https://{{ domain }}
Let’s Encrypt
You should also setup TLS, for example with Let’s Encrypt. Here’s a guide for setting up letsencrypt on Ubuntu.
For federation to work, it is important that you do not change any headers that form part of the signature. This includes the Host header - you may need to refer to the documentation for your proxy server to pass through the Host header unmodified.
Updating
To update to the newest version, it is usually enough to change the version numbers in docker-compose.yml, eg dessalines/lemmy:0.19.4 to dessalines/lemmy:0.19.5. If additional steps are required, these are explained in the respective release announcement. After changing the versions, run these commands:
docker compose pull
docker compose up -d
Install with Ansible
Follow the instructions on the Lemmy-Ansible repo.
Install from Scratch
These instructions are written for Ubuntu 20.04 / Ubuntu 22.04. They are particularly useful when you’d like to setup a Lemmy container (e.g. LXC on Proxmox) and cannot use Docker.
Lemmy is built from source in this guide, so this may take a while, especially on slow devices. For example, Lemmy v0.18.5 takes around 7 minutes to build on a quad core VPS.
Installing and configuring Lemmy using this guide takes about 60-90 minutes. You might need to make yourself a fresh cup of coffee before you start.
Installation
Database
For Ubuntu 20.04 the shipped PostgreSQL version is 12 which is not supported by Lemmy. So let’s set up a newer one. The most recent stable version of PostgreSQL is 16 at the time of writing this guide.
Install dependencies
sudo apt install -y wget ca-certificates pkg-config
wget --quiet -O - https://www.postgresql.org/media/keys/ACCC4CF8.asc | sudo apt-key add -
sudo sh -c 'echo "deb http://apt.postgresql.org/pub/repos/apt/ $(lsb_release -cs)-pgdg main" >> /etc/apt/sources.list.d/pgdg.list'
sudo apt update
sudo apt install libssl-dev libpq-dev postgresql
Setup Lemmy database
Replace db-passwd with a unique password of your choice in the commands below.
sudo -iu postgres psql -c "CREATE USER lemmy WITH PASSWORD 'db-passwd';"
sudo -iu postgres psql -c "CREATE DATABASE lemmy WITH OWNER lemmy;"
If you’re migrating from an older version of Lemmy, the following might be required.
sudo -iu postgres psql -c "ALTER USER lemmy WITH SUPERUSER;"
Tune your PostgreSQL settings to match your hardware via this guide
Setup md5 auth
Your Postgres config might need to be edited to allow password authentication instead of peer authentication. Simply add the following to your pg_hba.conf:
local lemmy lemmy md5
Install Rust
For the Rust compiles, it is ideal to use a non-privileged Linux account on your system. Install Rust by following the instructions on Rustup (using a non-privileged Linux account, it will install file in that user’s home folder for rustup and cargo).
protobuf-compiler may be required for Ubuntu 20.04 or 22.04 installs, please report testing in lemmy-docs issues.
sudo apt install protobuf-compiler gcc
Setup pict-rs (Optional)
You can skip this section if you don’t require image hosting, but NOTE that Lemmy-ui will still allow users to attempt uploading images even if pict-rs is not configured. In this situation, the upload will fail and users will receive technical error messages.
Lemmy supports image hosting using pict-rs. We need to install a couple of dependencies for this. It requires the magick command which comes with Imagemagick version 7, but Ubuntu 20.04 only comes with Imagemagick 6. So you need to install that command manually, eg from the official website.
NOTE: on standard LXC containers an AppImage-based ImageMagick installation will not work properly. It uses FUSE which will emit “permission denied” errors when trying to upload an image through pict-rs. You must use alternative installation methods, such as imei.sh.
AppImage-based installation of ImageMagick
sudo apt install ffmpeg exiftool libgexiv2-dev --no-install-recommends
# save the file to a working folder it can be verified before copying to /usr/bin/
wget https://download.imagemagick.org/ImageMagick/download/binaries/magick
# compare hash with the "message digest" on the official page linked above
sha256sum magick
sudo mv magick /usr/bin/
sudo chmod 755 /usr/bin/magick
imei.sh-based installation of ImageMagick
Follow the instructions from the official imei.sh page on GitHub
Standalone pict-rs installation
Since we’re building stuff from source here, let’s do the same for pict-rs. Follow the instructions here.
Lemmy Backend
Build the backend
Create user account on Linux for the lemmy_server application
sudo adduser lemmy --system --disabled-login --no-create-home --group
Compile and install Lemmy, given the from-scratch intention, this will be done via GitHub checkout. This can be done by a normal unprivledged user (using the same Linux account you used for rustup).
git clone https://github.com/LemmyNet/lemmy.git lemmy
cd lemmy
git checkout 0.18.5
git submodule init
git submodule update
Then build Lemmy with the following command:
cargo build --release
Deployment
Because we should follow the Linux way, we should use the /opt directory to colocate the backend, frontend and pict-rs.
sudo mkdir /opt/lemmy
sudo mkdir /opt/lemmy/lemmy-server
sudo mkdir /opt/lemmy/pictrs
sudo mkdir /opt/lemmy/pictrs/files
sudo mkdir /opt/lemmy/pictrs/sled-repo
sudo mkdir /opt/lemmy/pictrs/old
sudo chown -R lemmy:lemmy /opt/lemmy
Note that it might not be the most obvious thing, but creating the pictrs directories is not optional.
Then copy the binary.
sudo cp target/release/lemmy_server /opt/lemmy/lemmy-server/lemmy_server
Configuration
This is the minimal Lemmy config, put this in /opt/lemmy/lemmy-server/lemmy.hjson (see here for more config options).
{
  database: {
    # put your db-passwd from above
    password: "db-passwd"
  }
  # replace with your domain
  hostname: example.com
  bind: "127.0.0.1"
  federation: {
    enabled: true
  }
  # remove this block if you don't require image hosting
  pictrs: {
    url: "http://localhost:8080/"
  }
}
Set the correct owner
chown -R lemmy:lemmy /opt/lemmy/
Server daemon
Add a systemd unit file, so that Lemmy automatically starts and stops, logs are handled via journalctl etc. Put this file into /etc/systemd/system/lemmy.service.
[Unit]
Description=Lemmy Server
After=network.target

[Service]
User=lemmy
ExecStart=/opt/lemmy/lemmy-server/lemmy_server
Environment=LEMMY_CONFIG_LOCATION=/opt/lemmy/lemmy-server/lemmy.hjson
Environment=PICTRS_ADDR=127.0.0.1:8080
Environment=RUST_LOG="info"
Restart=on-failure
WorkingDirectory=/opt/lemmy

# Hardening
ProtectSystem=yes
PrivateTmp=true
MemoryDenyWriteExecute=true
NoNewPrivileges=true

[Install]
WantedBy=multi-user.target
If you need debug output in the logs, change the RUST_LOG line in the file above to
Environment=RUST_LOG="debug,lemmy_server=debug,lemmy_api=debug,lemmy_api_common=debug,lemmy_api_crud=debug,lemmy_apub=debug,lemmy_db_schema=debug,lemmy_db_views=debug,lemmy_db_views_actor=debug,lemmy_db_views_moderator=debug,lemmy_routes=debug,lemmy_utils=debug,lemmy_websocket=debug"
Then run
sudo systemctl daemon-reload
sudo systemctl enable lemmy
sudo systemctl start lemmy
If you did everything right, the Lemmy logs from sudo journalctl -u lemmy should show “Starting http server at 127.0.0.1:8536”. You can also run curl localhost:8536/api/v3/site which should give a successful response, looking like {"site_view":null,"admins":[],"banned":[],"online":0,"version":"unknown version","my_user":null,"federated_instances":null}. For pict-rs, run curl 127.0.0.1:8080 and ensure that it outputs nothing (particularly no errors).
Lemmy Front-end (lemmy-ui)
Install dependencies
Nodejs in Ubuntu 20.04 / Ubuntu 22.04 repos are too old, so let’s install Node 20.
# nodejs
sudo apt install -y ca-certificates curl gnupg
sudo mkdir -p /etc/apt/keyrings
curl -fsSL https://deb.nodesource.com/gpgkey/nodesource-repo.gpg.key | sudo gpg --dearmor -o /etc/apt/keyrings/nodesource.gpg
echo "deb [signed-by=/etc/apt/keyrings/nodesource.gpg] https://deb.nodesource.com/node_20.x nodistro main" | sudo tee /etc/apt/sources.list.d/nodesource.list

sudo apt update
sudo apt install nodejs

# pnpm
npm i -g pnpm
Build the front-end
Clone the git repo, checkout the version you want (0.18.5 in this case), and compile it.
# dont compile as admin
cd /opt/lemmy
sudo -u lemmy bash
git clone https://github.com/LemmyNet/lemmy-ui.git --recursive
cd lemmy-ui
git checkout 0.18.5 # replace with the version you want to install
pnpm i
pnpm build:prod
exit
UI daemon
Add another systemd unit file, this time for lemmy-ui. You need to replace example.com with your actual domain. Put the file in /etc/systemd/system/lemmy-ui.service
[Unit]
Description=Lemmy UI
After=lemmy.service
Before=nginx.service

[Service]
User=lemmy
WorkingDirectory=/opt/lemmy/lemmy-ui
ExecStart=/usr/bin/node dist/js/server.js
Environment=LEMMY_UI_LEMMY_INTERNAL_HOST=localhost:8536
Environment=LEMMY_UI_LEMMY_EXTERNAL_HOST=example.com
Environment=LEMMY_UI_HTTPS=true
Restart=on-failure

# Hardening
ProtectSystem=full
PrivateTmp=true
NoNewPrivileges=true

[Install]
WantedBy=multi-user.target
More UI-related variables can be found here.
Then run.
sudo systemctl daemon-reload
sudo systemctl enable lemmy-ui
sudo systemctl start lemmy-ui
If everything went right, the command curl -I localhost:1234 should show 200 OK at the top.
Configure reverse proxy and TLS
Install dependencies
sudo apt install nginx certbot python3-certbot-nginx
Request Let’s Encrypt TLS certificate (just follow the instructions)
sudo certbot certonly --nginx
Let’s Encrypt certificates should be renewed automatically, so add the line below to your crontab, by running sudo crontab -e. Replace example.com with your actual domain.
@daily certbot certonly --nginx --cert-name example.com -d example.com --deploy-hook 'nginx -s reload'
Finally, add the Nginx virtual host config file. Copy paste the file below to /etc/nginx/sites-enabled/lemmy.conf
limit_req_zone $binary_remote_addr zone={{domain}}_ratelimit:10m rate=1r/s;

server {
    listen 80;
    listen [::]:80;
    server_name {{domain}};
    location /.well-known/acme-challenge/ {
        root /var/www/certbot;
    }
    location / {
        return 301 https://$host$request_uri;
    }
}

server {
    listen 443 ssl http2;
    listen [::]:443 ssl http2;
    server_name {{domain}};

    ssl_certificate /etc/letsencrypt/live/{{domain}}/fullchain.pem;
    ssl_certificate_key /etc/letsencrypt/live/{{domain}}/privkey.pem;

    # Various TLS hardening settings
    # https://raymii.org/s/tutorials/Strong_SSL_Security_On_nginx.html
    ssl_protocols TLSv1.2 TLSv1.3;
    ssl_prefer_server_ciphers on;
    ssl_ciphers 'ECDHE-ECDSA-AES256-GCM-SHA384:ECDHE-RSA-AES256-GCM-SHA384:ECDHE-ECDSA-CHACHA20-POLY1305:ECDHE-RSA-CHACHA20-POLY1305:ECDHE-ECDSA-AES128-GCM-SHA256:ECDHE-RSA-AES128-GCM-SHA256:ECDHE-ECDSA-AES256-SHA384:ECDHE-RSA-AES256-SHA384:ECDHE-ECDSA-AES128-SHA256:ECDHE-RSA-AES128-SHA256';
    ssl_session_timeout  10m;
    ssl_session_cache shared:SSL:10m;
    ssl_session_tickets on;
    ssl_stapling on;
    ssl_stapling_verify on;

    # Hide nginx version
    server_tokens off;

    # Enable compression for JS/CSS/HTML bundle, for improved client load times.
    # It might be nice to compress JSON, but leaving that out to protect against potential
    # compression+encryption information leak attacks like BREACH.
    gzip on;
    gzip_types text/css application/javascript image/svg+xml;
    gzip_vary on;

    # Only connect to this site via HTTPS for the two years
    add_header Strict-Transport-Security "max-age=63072000";

    # Various content security headers
    add_header Referrer-Policy "same-origin";
    add_header X-Content-Type-Options "nosniff";
    add_header X-Frame-Options "DENY";
    add_header X-XSS-Protection "1; mode=block";

    # Upload limit for pictrs
    client_max_body_size 20M;

    # frontend
    location / {
      # The default ports:

      set $proxpass "http://0.0.0.0:1234";
      if ($http_accept ~ "^application/.*$") {
        set $proxpass "http://0.0.0.0:8536";
      }
      if ($request_method = POST) {
        set $proxpass "http://0.0.0.0:8536";
      }
      proxy_pass $proxpass;

      rewrite ^(.+)/+$ $1 permanent;

      # Send actual client IP upstream
      proxy_set_header X-Real-IP $remote_addr;
      proxy_set_header Host $host;
      proxy_set_header X-Forwarded-For $proxy_add_x_forwarded_for;
    }

    # backend
    location ~ ^/(api|pictrs|feeds|nodeinfo|.well-known) {
      proxy_pass http://0.0.0.0:8536;
      proxy_http_version 1.1;
      proxy_set_header Upgrade $http_upgrade;
      proxy_set_header Connection "upgrade";

      # Rate limit
      limit_req zone={{domain}}_ratelimit burst=30 nodelay;

      # Add IP forwarding headers
      proxy_set_header X-Real-IP $remote_addr;
      proxy_set_header Host $host;
      proxy_set_header X-Forwarded-For $proxy_add_x_forwarded_for;
    }
}

access_log /var/log/nginx/access.log combined;
And then replace some variables in the file. Put your actual domain instead of example.com
sudo sed -i -e 's/{{domain}}/example.com/g' /etc/nginx/sites-enabled/lemmy.conf
sudo systemctl reload nginx
Now open your Lemmy domain in the browser, and it should show you a configuration screen. Use it to create the first admin user and the default community.
Upgrading
Lemmy
Compile and install lemmy_server changes. This compile can be done by a normal unprivledged user (using the same Linux account you used for rustup and first install of Lemmy).
rustup update
cd lemmy
git checkout main
git pull --tags
git checkout 0.18.5 # replace with version you are updating to
git submodule update
cargo build --release
# copy compiled binary to destination
# the old file will be locked by the already running application, so this sequence is recommended:
sudo -- sh -c 'systemctl stop lemmy && cp target/release/lemmy_server /opt/lemmy/lemmy-server/lemmy_server && systemctl start lemmy'
Lemmy UI
cd /opt/lemmy/lemmy-ui
sudo -u lemmy bash
git checkout main
git pull --tags
git checkout 0.18.5 # replace with the version you are updating to
git submodule update
pnpm install
pnpm build:prod
exit
sudo systemctl restart lemmy-ui
Pict-rs
Refer to pict-rs documentation for instructions on upgrading.
Install on AWS
⚠️ Disclaimer: this installation method is not recommended by the Lemmy developers. If you have any problems, you need to solve them yourself or ask the respective authors. If you notice any Lemmy bugs on an instance installed like this, please mention it in the bug report.
Lemmy AWS CDK
This contains the necessary infrastructure definitions to deploy Lemmy to AWS using their Cloud Development Kit.
Included:
- ECS Fargate cluster
- Lemmy-UI
- Lemmy
- Pictrs
- CloudFront CDN
- EFS storage for image uploads
- Aurora Serverless Postgres DB
- Bastion VPC host
- Load balancers for Lemmy
- DNS records for your site
Quickstart
Clone the Lemmy-CDK.
Clone Lemmy and Lemmy-UI to the directory above this.
cp example.env.local .env.local
# edit .env.local
You should edit .env.local with your site settings.
npm install -g aws-cdk
npm install
cdk bootstrap
cdk deploy
Cost
This is not the cheapest way to run Lemmy. The Serverless Aurora DB can run you ~$90/mo if it doesn’t go to sleep.
Useful CDK commands
npm run buildcompile typescript to jsnpm run watchwatch for changes and compilenpm run testperform the jest unit testscdk deploydeploy this stack to your default AWS account/regioncdk diffcompare deployed stack with current statecdk synthemits the synthesized CloudFormation template
First Steps
After you successfully installed Lemmy either manually with Docker or automatically with Ansible here are some recommendations for a new administrator of a Lemmy server.
Admin Settings
The first thing to do is to go to your admin panel, which can be found by clicking on the cog at the top right next to the search icon. Here you can define a description for your site, so that people know if it is about one specific topic or if all subjects are welcome. You can also add an icon and a banner that define your server, it can for example be the logo of your organization.
Take the time to browse through the entire page to discover the different options you have to customize your Lemmy instance, on the same page you can edit your configuration file, where you can find information about your database, the email used by the server, the federation options or who is the main administrator.
It is always good to define another administrator than yourself, in case it is necessary to take actions while you take your best nap. Take a look at the moderation guide for more information on how to do this.
Check that everything is working properly
The easiest way to check that the email is set up correctly is to request a password renewal. You will need to set up an email in your settings if you have not already done so.
After that just log out, go to the Login page, enter your email in the Email or Username box and press forgot password. If everything is set up correctly, you should receive an email to renew your password. You can ignore this email.
Federation
Federation is disabled by default, and needs to be enabled either through the online admin panel or directly through the config.json file.
To test that your instance federation is working correctly execute curl -H 'Accept: application/activity+json' https://your-instance.com/u/your-username, it should return json data, and not an .html file. If that is unclear to you, it should look similar to the output of curl -H 'Accept: application/activity+json' https://lemmy.ml/u/nutomic.
Inclusion on join-lemmy.org instance list
To be included in the list of Lemmy instances on join-lemmy.org you must meet the following requirements:
- Federate with at least one instance from the list
- Have a site description and icon
- Make sure you require registration applications. This helps keep bots and trolls from using your server to spam the fediverse.
- Have at least 5 users who posted or commented at least once in the past month
- Be on the latest major version of Lemmy
- Be patient and wait the site to be updated, there’s no fixed schedule for that
Recommended instances are defined in code here and the code that powers the crawler is visible here.
In the meantime you can always promote your server on other social networks like Mastodon using the hashtag #Lemmy.
Keeping up to date
You can subscribe to the Github RSS feeds to be informed of the latest releases:
There is also a Matrix chat for instance administrators that you can join. You’ll find some really friendly people there who will help you (or at least try to) if you run into any issue.
Configuration
The configuration is based on the file config.hjson, which is located by default at config/config.hjson, or lemmy.hjson when using Docker. You can set a different path with the environment variable LEMMY_CONFIG_LOCATION.
Full config with default values
{
  # settings related to the postgresql database
  database: {
    # Configure the database by specifying a URI
    #
    # This is the preferred method to specify database connection details since
    # it is the most flexible.
    # Connection URI pointing to a postgres instance
    #
    # This example uses peer authentication to obviate the need for creating,
    # configuring, and managing passwords.
    #
    # For an explanation of how to use connection URIs, see [here][0] in
    # PostgreSQL's documentation.
    #
    # [0]: https://www.postgresql.org/docs/current/libpq-connect.html#id-1.7.3.8.3.6
    uri: "postgresql:///lemmy?user=lemmy&host=/var/run/postgresql"

    # or

    # Configure the database by specifying parts of a URI
    #
    # Note that specifying the `uri` field should be preferred since it provides
    # greater control over how the connection is made. This merely exists for
    # backwards-compatibility.
    # Username to connect to postgres
    user: "string"
    # Password to connect to postgres
    password: "string"
    # Host where postgres is running
    host: "string"
    # Port where postgres can be accessed
    port: 123
    # Name of the postgres database for lemmy
    database: "string"
    # Maximum number of active sql connections
    #
    # A high value here can result in errors "could not resize shared memory segment". In this case
    # it is necessary to increase shared memory size in Docker: https://stackoverflow.com/a/56754077
    pool_size: 30
  }
  # Pictrs image server configuration.
  pictrs: {
    # Address where pictrs is available (for image hosting)
    url: "http://localhost:8080/"
    # Set a custom pictrs API key. ( Required for deleting images )
    api_key: "string"
    # Backwards compatibility with 0.18.1. False is equivalent to `image_mode: None`, true is
    # equivalent to `image_mode: StoreLinkPreviews`.
    #
    # To be removed in 0.20
    cache_external_link_previews: true
    # Specifies how to handle remote images, so that users don't have to connect directly to remote
    # servers.
    image_mode:
      # Leave images unchanged, don't generate any local thumbnails for post urls. Instead the
      # Opengraph image is directly returned as thumbnail
      "None"

      # or

      # Generate thumbnails for external post urls and store them persistently in pict-rs. This
      # ensures that they can be reliably retrieved and can be resized using pict-rs APIs. However
      # it also increases storage usage.
      #
      # This is the default behaviour, and also matches Lemmy 0.18.
      "StoreLinkPreviews"

      # or

      # If enabled, all images from remote domains are rewritten to pass through
      # `/api/v3/image_proxy`, including embedded images in markdown. Images are stored temporarily
      # in pict-rs for caching. This improves privacy as users don't expose their IP to untrusted
      # servers, and decreases load on other servers. However it increases bandwidth use for the
      # local server.
      #
      # Requires pict-rs 0.5
      "ProxyAllImages"
    # Allows bypassing proxy for specific image hosts when using ProxyAllImages.
    #
    # imgur.com is bypassed by default to avoid rate limit errors. When specifying any bypass
    # in the config, this default is ignored and you need to list imgur explicitly. To proxy imgur
    # requests, specify a noop bypass list, eg `proxy_bypass_domains ["example.org"]`.
    proxy_bypass_domains: [
      "i.imgur.com"
      /* ... */
    ]
    # Timeout for uploading images to pictrs (in seconds)
    upload_timeout: 30
    # Resize post thumbnails to this maximum width/height.
    max_thumbnail_size: 512
  }
  # Email sending configuration. All options except login/password are mandatory
  email: {
    # Hostname and port of the smtp server
    smtp_server: "localhost:25"
    # Login name for smtp server
    smtp_login: "string"
    # Password to login to the smtp server
    smtp_password: "string"
    # Address to send emails from, eg "noreply@your-instance.com"
    smtp_from_address: "noreply@example.com"
    # Whether or not smtp connections should use tls. Can be none, tls, or starttls
    tls_type: "none"
  }
  # Parameters for automatic configuration of new instance (only used at first start)
  setup: {
    # Username for the admin user
    admin_username: "admin"
    # Password for the admin user. It must be between 10 and 60 characters.
    admin_password: "tf6HHDS4RolWfFhk4Rq9"
    # Name of the site, can be changed later. Maximum 20 characters.
    site_name: "My Lemmy Instance"
    # Email for the admin user (optional, can be omitted and set later through the website)
    admin_email: "user@example.com"
  }
  # the domain name of your instance (mandatory)
  hostname: "unset"
  # Address where lemmy should listen for incoming requests
  bind: "0.0.0.0"
  # Port where lemmy should listen for incoming requests
  port: 8536
  # Whether the site is available over TLS. Needs to be true for federation to work.
  tls_enabled: true
  federation: {
    # Limit to the number of concurrent outgoing federation requests per target instance.
    # Set this to a higher value than 1 (e.g. 6) only if you have a huge instance (>10 activities
    # per second) and if a receiving instance is not keeping up.
    concurrent_sends_per_instance: 1
  }
  prometheus: {
    bind: "127.0.0.1"
    port: 10002
  }
  # Sets a response Access-Control-Allow-Origin CORS header
  # https://developer.mozilla.org/en-US/docs/Web/HTTP/Headers/Access-Control-Allow-Origin
  cors_origin: "lemmy.tld"
  # Print logs in JSON format. You can also disable ANSI colors in logs with env var `NO_COLOR`.
  json_logging: false
}
Lemmy-UI configuration
Lemmy-UI can be configured using environment variables, detailed in its README.
Theming Guide
Bootstrap
Lemmy uses Bootstrap v5, and very few custom css classes, so any bootstrap v5 compatible theme should work fine. Use a tool like bootstrap.build to create a bootstrap v5 theme. Export the bootstrap.min.css once you’re done, and save the _variables.scss too.
Custom Theme Directory
If you installed Lemmy with Docker, save your theme file to ./volumes/lemmy-ui/extra_themes. For native installation (without Docker), themes are loaded by lemmy-ui from ./extra_themes folder. A different path can be specified with LEMMY_UI_EXTRA_THEMES_FOLDER environment variable.
After a theme is added, users can select it under /settings. Admins can set a theme as site default under /admin.
Default Theme Locations
Default Lemmy themes are located in /lemmy-ui/src/assets/css/themes. Atom themes used for styling <code> are in /lemmy-ui/src/assets/css/code-themes. Custom css classes and changes to the default Bootstrap styles are in /lemmy-ui/src/assets/css/main.css.
Making CSS Themes with Sass and Bootstrap
Some tips if making a theme based off the default Lemmy themes.
Every theme has these files:
- an output
theme.css - an output
theme.css.map theme.scss_variables.theme.scss
All _variables.theme.scss files will inherit variables from _variables.scss.
All theme.scss will import bootstrap variables from "../../../../node_modules/bootstrap/scss/bootstrap"; and its _variables.theme.scss file. It may import additional variables from another theme if it is built off it. For example, litely-compact.scss imports from _variables.litely.scss.
Using SCSS Files
If you are new to Sass, keep in mind that theme.scss files are for css and Sass flavored css. _variables.theme.scss are for variables.
Export Your CSS File
To export your custom .scss and _variables.theme.scss files to a .css file open the command line in the same directory as your files and run:
sass theme.scss theme.css which will generate the .css and .css.map files.
Bootstrap Notes
If you are new to Bootstrap, be aware that variables starting with a dollar sign like $variable are Bootstrap variables and when output to css will look like --bs-variable. You can also define custom root variables in your _variables.theme.scss files like :root {--custom-variable: value;}; and you can refer to this again in your theme.scss file.
Bootstrap Variables on Lemmy
The Darkly and Litely themes use default Bootstrap variables to define the grayscales and colours. Inspecting the Bootstrap documentation for how colours are applied to elements is recommended, along with inspecting the CSS and output files.
Light and Dark Modes
Even though darkly.css is a dark theme, it has in-built light and dark modes using media queries. The Bootstrap variables $enable-dark-mode and $enable-light-mode can be used to toggle this behaviour on or off.
Overwriting Variables
Most Lemmy theming is done with Bootstrap’s default variables. Some variables are defined with !important which means if you have defined them in your custom theme that unless it also has !important it will be overwritten. To check, do a search in one of the default theme files or use the Developer Tools in your browser.
To quickly test your theme if you do not own a Lemmy instance, you can use a browser add on to load your custom CSS file.
External Stylesheets
As users cannot currently upload their own themes in Settings (only Admin can do that), custom themes loaded with an external style sheet will need to take into account that users will have a pre-selected theme in Settings that may have conflicting styles with the custom theme. If a theme is developed from an existing theme, having the default theme selected in Settings can minimize style conflicts.
How CSS Themes are Added to Settings
In short, given the css theme is the correct file format and in the correct theme directory, it will be appended to the bottom of the theme list in Settings. The name is the filename minus the file extension. Details are below.
CSS Format Check
The Typescript file theme-handler.ts in /lemmy-ui/src/server/handlers/ will check for existing css files from the custom theme folder (./volumes/lemmy-ui/extra_themes or ./extra_themes). Non css files will trigger an error.
Building the Theme List
If a custom css theme is found, the handler will call themes-list-handler.ts which will load build-themes-list.ts from /lemmy-ui/src/server/utils/. The file build-themes-list.ts will search the directories for files ending in .css and build a list.
Custom themes are appended to the bottom of the theme list.
Theme Names
build-themes-list.ts will remove the file extension .css from the theme filename to display in Settings. For example, darkly-compact.css will appear as darkly-compact.
Build and Format Theme Files Quickly
Some tips to save time which would be useful for theme developers or if you are submitting pull requests to lemmy-ui (Github).
After changing variables or Sass files:
- run
pnpm themes:buildto automatically rebuild all Lemmy css theme files using Sass - run
npx prettier -w /lemmy-ui/src/assets/css/themesto reformat the code in the themes directory with prettier
Getting started with Federation
Federation is enabled by default, but initially you won’t see any content from other Lemmy instances. To get started you can browse other Lemmy instances for interesting communities, or browse the community list on lemmyverse.net. Once you find an interesting community, simply paste the URL into the search field on your own Lemmy instance, for example https://lemmy.ml/c/announcements. To have new content in the community pushed to your instance, you need to click the “Follow” button in the sidebar.
If you notice that community follows are still shown as “Subscription Pending” after a few hours, or your posts are not visible on other instances, you may have a configuration problem. Check out the troubleshooting guide, you can also ask for help in !lemmy@lemmy.ml or the admin chat on Matrix.
Fetching Data
If you see something interesting while browsing another Lemmy instance, you can easily import it in order to interact with the content. This works for users, communities, posts and comments. For posts and comments, you can get the correct URL from the colorful “Fedilink” icon. All of the following formats are valid to fetch data over federation:
https://lemmy.ml/c/programming(Community)https://lemmy.ml/u/nutomic(User)https://lemmy.ml/post/123(Post)https://lemmy.ml/comment/321(Comment)!main@lemmy.ml(Community)@nutomic@lemmy.ml(User)
When fetching a community, the most recent posts are also fetched automatically (but not comments or votes). When fetching a post, the community and author are also fetched automatically. And for comments, all parent comments, the post, their respective authors and the community are fetched. Sibling comments are not fetched automatically. If you want more comments from older posts, you have to search for each of them as described above.
You can also fetch content from other Fediverse platforms such as Piefed or Mbin. Other platforms may also work, but only if they use communities like Lemmy.
Blocking or Allowing Instances
Lemmy has three types of federation:
- Allowlist: Explicitly list instances to connect to.
- BlockList: Explicitly list instances to not connect to. Federation is open to all other instances.
- Open: Federate with all potential instances.
You can add allowed and blocked instances, by adding a list in your instance admin panel. IE to only federate with these instances, add: enterprise.lemmy.ml,lemmy.ml to the allowed instances section.
Lemmy uses the ActivityPub protocol (a W3C standard) to enable federation between different servers (often called instances). This is very similar to the way email works. For example, if you use gmail.com, then you can not only send mails to other gmail.com users, but also to yahoo.com, yandex.ru and so on. Email uses the SMTP protocol to achieve this, so you can think of ActivityPub as “SMTP for social media”. The many of different actions possible on social media (post, comment, like, share, etc) make that ActivityPub is much more complicated than SMTP.
As with email, ActivityPub federation happens only between servers. So if you are registered on enterprise.lemmy.ml, you only connect to the API of enterprise.lemmy.ml, while the server takes care of sending and receiving data from other instances (eg voyager.lemmy.ml). The great advantage of this approach is that the average user doesn’t have to do anything to use federation. In fact if you are using Lemmy, you are likely already using it. One way to confirm is by going to a community or user profile. If you are on enterprise.lemmy.ml and you see a user like @nutomic@voyager.lemmy.ml, or a community like !main@ds9.lemmy.ml, then those are federated, meaning they use a different instance from yours.
Troubleshooting
Different problems that can occur on a new instance, and how to solve them.
Many Lemmy features depend on a correct reverse proxy configuration. Make sure yours is equivalent to our nginx config.
General
Logs
For frontend issues, check the browser console for any error messages.
For server logs, run docker compose logs -f lemmy in your installation folder. You can also do docker compose logs -f lemmy lemmy-ui pictrs to get logs from different services.
If that doesn’t give enough info, try changing the line RUST_LOG=error in docker-compose.yml to RUST_LOG=info or RUST_LOG=trace, then do docker compose restart lemmy.
Creating admin user doesn’t work
Make sure that websocket is working correctly, by checking the browser console for errors. In nginx, the following headers are important for this:
proxy_http_version 1.1;
proxy_set_header Upgrade $http_upgrade;
proxy_set_header Connection "upgrade";
Rate limit error when many users access the site
Check that the headers X-Real-IP and X-Forwarded-For are sent to Lemmy by the reverse proxy. Otherwise, it will count all actions towards the rate limit of the reverse proxy’s IP. In nginx it should look like this:
proxy_set_header X-Real-IP $remote_addr;
proxy_set_header Host $host;
proxy_set_header X-Forwarded-For $proxy_add_x_forwarded_for;
Federation
Other instances can’t fetch local objects (community, post, etc)
Your reverse proxy (eg nginx) needs to forward requests with header Accept: application/activity+json to the backend. This is handled by the following lines:
set $proxpass "http://0.0.0.0:{{ lemmy_ui_port }}";
if ($http_accept = "application/activity+json") {
set $proxpass "http://0.0.0.0:{{ lemmy_port }}";
}
if ($http_accept = "application/ld+json; profile=\"https://www.w3.org/ns/activitystreams\"") {
set $proxpass "http://0.0.0.0:{{ lemmy_port }}";
}
proxy_pass $proxpass;
You can test that it works correctly by running the following commands, all of them should return valid JSON:
curl -H "Accept: application/activity+json" https://your-instance.com/u/some-local-user
curl -H "Accept: application/activity+json" https://your-instance.com/c/some-local-community
curl -H "Accept: application/activity+json" https://your-instance.com/post/123 # the id of a local post
curl -H "Accept: application/activity+json" https://your-instance.com/comment/123 # the id of a local comment
Fetching remote objects works, but posting/commenting in remote communities fails
Check that federation is allowed on both instances.
Also ensure that the time is correct on your server. Activities are signed with a timestamp, and will be discarded if it is off by more than one hour.
It is possible that federation requests to /inbox are blocked by tools such as Cloudflare. The sending instance can find HTTP errors with the following steps:
- If you use a separate container for outgoing federation, you need to apply the following steps to that container only
- Set
RUST_LOG=lemmy_federate=tracefor Lemmy - Reload the new configuration:
docker compose up -d - Search for messages containing the target instance domain:
docker compose logs -f --tail=100 lemmy | grep -F lemm.ee -C 10 - You also may have to reset the fail count for the target instance (see below)
Reset federation fail count for instance
If federation sending to a specific instance has been failing consistently, Lemmy will slow down sending using exponential backoff. For testing it can be useful to reset this and make Lemmy send activities immediately. To do this use the following steps:
- Stop Lemmy, or specifically the container for outgoing federation
docker compose stop lemmy - Enter SQL command line:
sudo docker compose exec postgres psql -U lemmy - Reset failure count via SQL:
update federation_queue_state
set fail_count = 0
from instance
where instance.id = federation_queue_state.instance_id
and instance.domain = 'lemm.ee';
- Exit SQL command line with
\q, then restart Lemmy:docker compose start lemmy
Other instances don’t receive actions reliably
Lemmy uses one queue per federated instance to send out activities. Search the logs for “Federation state” for summaries. Errors will also be logged.
For details, execute this SQL query:
select domain,currval('sent_activity_id_seq') as latest_id, last_successful_id,fail_count,last_retry from federation_queue_state
join instance on instance_id = instance.id order by last_successful_id asc;
You will see a table like the following:
| domain | latest_id | last_successful_id | fail_count | last_retry |
|---|---|---|---|---|
| toad.work | 6837196 | 6832351 | 14 | 2023-07-12 21:42:22.642379+00 |
| lemmy.deltaa.xyz | 6837196 | 6837196 | 0 | 1970-01-01 00:00:00+00 |
| battleangels.net | 6837196 | 6837196 | 0 | 1970-01-01 00:00:00+00 |
| social.fbxl.net | 6837196 | 6837196 | 0 | 1970-01-01 00:00:00+00 |
| mastodon.coloradocrest.net | 6837196 | 6837196 | 0 | 1970-01-01 00:00:00+00 |
This will show you exactly which instances are up to date or not.
You can also use this website which will help you monitor this without admin rights, and also let others see it
https://phiresky.github.io/lemmy-federation-state/site
You don’t receive actions reliably
Due to the lemmy queue, remote lemmy instances will be sending apub sync actions serially to you. If your server rate of processing them is slower than the rate the origin server is sending them, when visiting the lemmy-federation-state for the remote server, you’ll see your instance in the “lagging behind” section.
This can be avoided by setting the config value federation.concurrent_sends_per_instance to a value greater than 1 on the sending instance.
Typically the speed at which you process an incoming action should be less than 100ms. If this is higher, this might signify problems with your database performance or your networking setup.
Note that even apub action ingestion speed which seems sufficient for most other instances, might become insufficient if the origin server is receiving actions from their userbase faster than you can process them. I.e. if the origin server receives 10 actions per second, but you can only process 8 actions per second, you’ll inevitably start falling behind that one server only.
These steps might help you diagnose this.
Check processing time on the loadbalancer
Check how long a request takes to process on the backend. In haproxy for example, the following command will show you the time it takes for apub actions to complete
tail -f /var/log/haproxy.log | grep "POST \/inbox"
If these actions take more than 100ms, you might want to investigate deeper.
Check your Database performance
Ensure that it’s not very high in CPU or RAM utilization.
Afterwards check for slow queries. If you regularly see common queries with high max and mean exec time, it might signify your database is struggling. The below SQL query will show you all queries (you will need pg_stat_statements enabled)
\x auto
SELECT user,query,max_exec_time,mean_exec_time,calls FROM pg_stat_statements WHERE max_exec_time > 10 AND CALLS > 100 ORDER BY max_exec_time DESC;
If you see very high time on inserts, you might want to consider disabling synchronous_commit to see if this helps.
Check your backend performance.
Like the DB, if the server where your lemmy rust backend is running is overloaded, you might see such an impact
Check your Network Layout
If your backend and database appear to be in good condition, it might be that your issue is network based.
One problem can occur is your backend and your database are not in the same server and are too far from each other in geographic location. Due to the amount of DB queries performed for each apub sync request, even a small amount of latency can quickly add up.
Check the latency between your rust backend and your DB using ping
ping your_database_ip
if the time you see if above 1-2ms, this can start causing such delays. In that case, you might want to consider moving your backend closer to your DB geographically, so that your latency is below 2ms
Note that your external loadbalancer(s) (if any) do not necessarily need to be closer to the DB, as they do not do multiple small DB requests.
Downgrading
If you upgraded your instance to a newer version (by mistake or planned) and need to downgrade it. Often you need to reverse database changes as well.
First you need to figure out what SQL changes happened between your upgraded version, and the one you’re downgrading. Then in that diff, check which files were added in the migrations dir.
Let’s say that for the migration you’re doing, the following were added
2023-10-24-131607_proxy_links
2023-10-27-142514_post_url_content_type
2023-12-19-210053_tolerable-batch-insert-speed
2023-12-22-040137_make-mixed-sorting-directions-work-with-tuple-comparison
2024-01-05-213000_community_aggregates_add_local_subscribers
2024-01-15-100133_local-only-community
2024-01-22-105746_lemmynsfw-changes
2024-01-25-151400_remove_auto_resolve_report_trigger
2024-02-15-171358_default_instance_sort_type
2024-02-27-204628_add_post_alt_text
2024-02-28-144211_hide_posts
Each of these folders contains a down.sql file. We need to run that against our postgresql DB to rollback those DB changes.
- Stop your lemmy backend, and take a backup of your DB.
- Copy the
migrationsfolder to your DB container or server - Acquire a shell in your postgresql container or server and switch to the
postgresuser - Run each relevant script with this command
Alternatively, copy the content of the file and paste into a psql sessiondownfolder=2024-02-28-144211_hide_posts psql -d lemmy -a -f /path/to/migrations/${downfolder}/down.sql - You now need to clean the
__diesel_schema_migrationstable from the migration records, so that they will be correctly applied the next time you upgrade. You can use this command to sort them
You have to delete the entries in that table which match the current timestamp you applied them (This should typically be any time in the past few minutes)select * from __diesel_schema_migrations ORDER BY run_on ASC;delete from __diesel_schema_migrations where version='20240228144211'; - You should now be able to start your lemmy in the previous version
UI randomly slow or offline
If you notice that your lemmy-ui sometimes becomes sluggish or unresponsive over a period of minutes/hours and then it passes, you might be getting targeted by scraping bots.
There’s a lot of scraping bots online and they can easily overwhelm your site when they’re behaving too “greedily”. Unfortunately the existing lemmy-ui has a habit of falling over when polled too eagerly, while the backend still continues to work.
A solution is to cache responses in nginx as seen in lemmy-ansible here and here. This way lemmy-ui doesn’t have to generate all responses from scratch, which reduces CPU load. However it won’t help if a single crawler goes through thousands of unique urls in a short time.
Another option is to block the scraper’s user agents. To do so, you can modify your nginx_internal.conf to block some of the usual suspects, with this line under server
if ($http_user_agent ~* " Bytedance|Bytespider|Amazonbot|ClaudeBot") { return 444; }
This is an example blocking some the well-known misbehaving bots, but there are many more more. To discover the ones affecting you, you can use the following bash script at your lemmy backend (where your docker compose is) to enumerate any agents which are hitting you too much.
docker-compose logs --tail=10000 proxy |
    grep -o '"[^"]*"$' |     # Extract the last quoted string (user agent)
    grep -v '^"$' |          # Remove empty quotes
    tr -d '"' |              # Remove the quotes
    sort |                   # Sort the user agents
    uniq -c |               # Count unique occurrences
    sort -rn |              # Sort numerically in reverse order
    head -n 10              # Show top 10 results
This will parse the last 10K log entries in your nginx internal proxy and show the agents which cause the most hits. This should give a good indicator of which agents are potentially misbehaving and you can proceed to block those as well by adding their names to the list above.
Backup and Restore
Docker and Ansible
When using docker or ansible, there should be a volumes folder, which contains both the database, and all the pictures. Copy this folder to the new instance to restore your data.
Full Database backup
To take a complete backup of the DB to a .sql.gz file, you can run:
docker compose exec postgres pg_dumpall -c -U lemmy | gzip > lemmy_dump_`date +%Y-%m-%d"_"%H_%M_%S`.sql.gz
For compression, you can use either gzip and gunzip, or xz and unxz.
A Sample backup script
#!/bin/sh
# DB Backup
ssh MY_USER@MY_IP "docker compose exec postgres pg_dumpall -c -U lemmy" | gzip > ~/BACKUP_LOCATION/INSTANCE_NAME_dump_`date +%Y-%m-%d"_"%H_%M_%S`.sql.gz

# Volumes folder Backup
rsync -avP -zz --rsync-path="sudo rsync" MY_USER@MY_IP:/LEMMY_LOCATION/volumes ~/BACKUP_LOCATION/FOLDERNAME
Restoring the DB
To restore, run:
docker compose up -d postgres

# Restore from the .sql.gz backup
gunzip < db_dump.sql  |  docker compose exec -T postgres psql -U lemmy

# Note: You may need to change the permissions on the postgres directory, depending on your system.
chown -R $USER volumes
docker compose restart postgres

# Continue with the startup
docker compose up -d
If you’ve accidentally already started the lemmy service, you need to clear out your existing database:
# Drop the existing DB
docker exec -i FOLDERNAME_postgres_1 psql -U lemmy -c "DROP SCHEMA public CASCADE; CREATE SCHEMA public;"

# This also might be necessary when doing a db import with a different password.
docker exec -i FOLDERNAME_postgres_1 psql -U lemmy -c "alter user lemmy with password 'bleh'"
Then run the restore commands above.
Changing your domain name
If you haven’t federated yet, you can change your domain name in the DB. Warning: do not do this after you’ve federated, or it will break federation.
Get into psql for your docker:
docker compose exec postgres psql -U lemmy
-- Instance
update instance set domain = replace (domain, 'old_domain', 'new_domain');

-- Site
update site set actor_id = replace (actor_id, 'old_domain', 'new_domain');
update site set inbox_url = replace (inbox_url, 'old_domain', 'new_domain');
update site set sidebar = replace (sidebar, 'old_domain', 'new_domain');

-- Post
update post set ap_id = replace (ap_id, 'old_domain', 'new_domain');
update post set url = replace (url, 'old_domain', 'new_domain');
update post set body = replace (body, 'old_domain', 'new_domain');
update post set thumbnail_url = replace (thumbnail_url, 'old_domain', 'new_domain');

-- Comments
update comment set ap_id = replace (ap_id, 'old_domain', 'new_domain');
update comment set content = replace (content, 'old_domain', 'new_domain');

-- Private messages
update private_message set ap_id = replace (ap_id, 'old_domain', 'new_domain');
update private_message set content = replace (content, 'old_domain', 'new_domain');

-- User
update person set actor_id = replace (actor_id, 'old_domain', 'new_domain');
update person set inbox_url = replace (inbox_url, 'old_domain', 'new_domain');
update person set shared_inbox_url = replace (shared_inbox_url, 'old_domain', 'new_domain');
update person set bio = replace (bio, 'old_domain', 'new_domain');
update person set avatar = replace (avatar, 'old_domain', 'new_domain');
update person set banner = replace (banner, 'old_domain', 'new_domain');

-- Community
update community set actor_id = replace (actor_id, 'old_domain', 'new_domain');
update community set followers_url = replace (followers_url, 'old_domain', 'new_domain');
update community set inbox_url = replace (inbox_url, 'old_domain', 'new_domain');
update community set shared_inbox_url = replace (shared_inbox_url, 'old_domain', 'new_domain');
update community set moderators_url = replace (moderators_url, 'old_domain', 'new_domain');
update community set featured_url = replace (featured_url, 'old_domain', 'new_domain');
update community set description = replace (description, 'old_domain', 'new_domain');
update community set icon = replace (icon, 'old_domain', 'new_domain');
update community set banner = replace (banner, 'old_domain', 'new_domain');

--- Custom Emoji
update custom_emoji set image_url = replace (image_url, 'old_domain', 'new_domain');
More resources
- https://stackoverflow.com/questions/24718706/backup-restore-a-dockerized-postgresql-database
Using Caddy as reverse proxy
If you prefer to use Caddy instead of Nginx - you could use this template to fit into your needs:
(caddy-common) {
    encode gzip
    header {
        -Server
        Strict-Transport-Security "max-age=31536000; include-subdomains;"
        X-XSS-Protection "1; mode=block"
        X-Frame-Options "DENY"
        X-Content-Type-Options nosniff
        Referrer-Policy  no-referrer-when-downgrade
        X-Robots-Tag "none"
    }
}

lemmy-site.com {
        import caddy-common
        reverse_proxy   http://lemmy_lemmy-ui_1:1234
}

@lemmy {
        path    /api/*
        path    /pictrs/*
        path    /feeds/*
        path    /nodeinfo/*
        path    /.well-known/*
}

@lemmy-hdr {
        header Accept application/*
}

handle @lemmy {
        reverse_proxy   http://lemmy_lemmy_1:8536
}

handle @lemmy-hdr {
        reverse_proxy   http://lemmy_lemmy_1:8536
}

@lemmy-post {
        method POST
}

handle @lemmy-post {
        reverse_proxy   http://lemmy_lemmy_1:8536
}
Lemmy on Separate Subdomains
This guide details hosting the Lemmy backend and frontend on different domains. This is useful, for example, if you want users to have a webfinger (user handle) without a subdomain, but want to host services on the same domain.
As a general overview, this works by handling federation requests on the short domain and forwarding them to the Lemmy backend. API and frontend requests however are handled on the long domain.
Placeholders
short.domainrepresents the shortened domain you would like to use for user handles.sub.longerdomain.comrepresents the domain where the UI will be served.- The
proxynetwork is the configured Traefik network, and is only referenced in the Traefik configuration. Please see the Traefik documentation. - The
backendnetwork is the network used to communicate between Docker containers. This is only referenced in the Traefik configuration. This can be renamed to your liking. In the configuration, this is referenced as anexternalDocker network, but can also be aninternalDocker network (documentation here).
Limitations
- If there is another service using the
/api,/pictrs,/feeds,/nodeinfo,/.well-known,/inbox,/version, and/sitemap.xmlpaths onshort.domain, it will conflict with the Lemmy server. Similarly, if there is a service onshort.domainlistening for theAccept: application/activity+jsonHTTP header, it will also conflict with the Lemmy server.
Traefik
This is the solution that is currently being tested (by this author). Federation is not a problem whatsoever, and everything is working correctly.
You can download the Docker Compose file by running:
wget https://raw.githubusercontent.com/LemmyNet/lemmy-docs/main/assets/separate_subdomains/traefik/compose.yml
Then continue the Docker instructions here, excluding the NGINX steps.
NGINX
This solution is derived from the Traefik configuration above. Please note, some configuration options may be unnecessary due to the fact that this was derived from a Traefik configuration. Feel free to open a pull request.
You can download the nginx_internal.conf file by running:
wget https://raw.githubusercontent.com/LemmyNet/lemmy-docs/main/assets/separate_subdomains/nginx/nginx_internal.conf
Ensure you edit nginx_internal.conf and replace {{ nginx_internal_resolver }} with 127.0.0.11 (use 10.89.0.1 for RedHat distributions).
Then continue installing with your preferred installation method. For example, these are the Docker instructions. Ensure you use the nginx_internal.conf file provided on this page.
Running a Tor Hidden Service
This guide assumes Lemmy has been installed using the official Docker Compose method.
Note that federation is not currently supported over the Tor network. An existing Lemmy instance is required. This procedure will proxy Lemmy though Tor, but federation tasks are still handled by HTTPS on the open internet.
Tor (“The Onion Router”) is software designed to circumvent censorship and prevent bad actors from monitoring your activity on the internet by encrypting and distributing network traffic through a decentralized pool of relay servers run by volunteers all over the world.
A Tor hidden service is only accessible through the Tor network using the .onion top-level domain with the official Tor Browser, or any client capable of communicating over a SOCKS5 proxy. Hosting a service on the Tor network is a good way to promote digital privacy and internet freedom.
Installing Tor
The official documentation suggests Ubuntu and Debian users install Tor from the deb.torproject.org repository because it always provides the latest stable release of the software.
Administrative Access is Required
Commands below are expected to be executed as the root user. To become root use sudo -i or su -.
With sudo:
sudo -i
Password: [authenticate with current user password]
With su:
su -
Password: [authenticate with root's password]
Note: To return to your account run: exit.
Verify your architecture is supported
The package repository only supports amd64, arm64, and i386 architectures.
dpkg --print-architecture
If your architecture is not supported you may want to consider installing Tor from source.
Install prerequisite packages
apt install -y apt-transport-https ca-certificates gpg lsb-release wget
Enable the deb.torproject.org repository
Configure apt to pull packages from deb.torproject.org.
bash -c 'dist=$(lsb_release -s -c); /bin/echo -e \
"deb [signed-by=/usr/share/keyrings/tor-archive-keyring.gpg] \
https://deb.torproject.org/torproject.org $dist main\n\
deb-src [signed-by=/usr/share/keyrings/tor-archive-keyring.gpg] \
https://deb.torproject.org/torproject.org $dist main" \
> /etc/apt/sources.list.d/tor.list'
Import deb.torproject.org’s GPG signing key
wget -qO- https://deb.torproject.org/torproject.org/A3C4F0F979CAA22CDBA8F512EE8CBC9E886DDD89.asc \
    | gpg --dearmor \
    | tee /usr/share/keyrings/tor-archive-keyring.gpg >/dev/null
The signing key ensures the package retrieved from the server was created by deb.torproject.org.
Install tor
apt update && apt install -y tor
Creating a Tor hidden service
Create a new hidden service directory:
mkdir /var/lib/tor/hidden_lemmy_service
Append the following to /etc/tor/torrc to tie the hidden service directory to the tor daemon:
HiddenServiceDir /var/lib/tor/hidden_lemmy_service/
HiddenServicePort 80 127.0.0.1:10080
HiddenServiceDir [path] is where tor will store data related to the hidden service, and HiddenServicePort [hidden_service_port] [host_ip:port] binds a port on the host to a hidden service port on the Tor network.
Enable and start the Tor daemon
systemctl enable --now tor
At startup tor daemon will automatically populate /var/lib/tor/hidden_lemmy_service/ with encryption keys, certificates, and assign a hostname for the new service.
Determine your hidden service’s hostname
cat /var/lib/tor/hidden_lemmy_service/hostname
The .onion address contained in this file will be referred to as HIDDEN_SERVICE_ADDR from here on.
Configure your existing Lemmy instance
Docker compose
Forward port 10080 from the proxy container to the hidden service port 127.0.0.1:10080. This exposes 10080/tcp to the local host, and will not be directly accessible from the internet. For context "80:80" binds port 80/tcp (HTTP) to 0.0.0.0:80 on the host. Unless a firewall is configured to block incoming traffic to 80 this will be exposed to other hosts on the local area network (LAN) and/or the open internet.
docker-compose.yml
services:
  # ...
  proxy:
    # ...
    ports:
      - "80:80"
      - "443:443"
      - "127.0.0.1:10080:10080"
Configure NGINX
Append a new server {...} block to handle tor traffic, and add the Onion-Location header to the SSL encrypted server exposed to the internet. This header informs Tor Browser users that an equivalent .onion site exists on the Tor network by displaying an icon next to the address bar.
nginx.conf
worker_processes 1;
events {
    worker_connections 1024;
}

http {
    # Original configuration listening on port 80
    server {
        listen 80;
        # ...
    }

    # Original configuration listening on port 443
    server {
        listen 443;
        # ...
        location / {
            # Handle Tor Browser's ".onion" link detection
            add_header Onion-Location "http://HIDDEN_SERVICE_ADDR$request_uri" always;
            # ...
        }
    }

    # Establish a rate limit for the hidden service address
    limit_req_zone $binary_remote_addr zone=HIDDEN_SERVICE_ADDR_ratelimit:10m rate=1r/s;

    # Add tor-specific upstream aliases as a visual aid to
    # avoid editing the incorrect server block in the future
    upstream lemmy-tor {
        server "lemmy:8536";
    }
    upstream lemmy-ui-tor {
        server "lemmy-ui:1234";
    }

    # Add a copy of your current internet-facing configuration with
    # "listen" and "server_listen" modified to send all traffic
    # over the Tor network, incorporating the visual upstream aliases
    # above.
    server {
        # Tell nginx to listen on the hidden service port
        listen 10080;

        # Set server_name to the contents of the file:
        # /var/lib/tor/hidden_lemmy_service/hostname
        server_name HIDDEN_SERVICE_ADDR;

        # Hide nginx version
        server_tokens off;

        # Enable compression for JS/CSS/HTML bundle, for improved client load times.
        # It might be nice to compress JSON, but leaving that out to protect against potential
        # compression+encryption information leak attacks like BREACH.
        gzip on;
        gzip_types text/css application/javascript image/svg+xml;
        gzip_vary on;

        # Various content security headers
        add_header Referrer-Policy "same-origin";
        add_header X-Content-Type-Options "nosniff";
        add_header X-Frame-Options "DENY";
        add_header X-XSS-Protection "1; mode=block";

        # Upload limit for pictrs
        client_max_body_size 20M;

        # frontend
        location / {
            # distinguish between ui requests and backend
            # don't change lemmy-ui or lemmy here, they refer to the upstream definitions on top
            set $proxpass "http://lemmy-ui-tor";

            if ($http_accept = "application/activity+json") {
                set $proxpass "http://lemmy-tor";
            }
            if ($http_accept = "application/ld+json; profile=\"https://www.w3.org/ns/activitystreams\"") {
                set $proxpass "http://lemmy-tor";
            }
            if ($request_method = POST) {
                set $proxpass "http://lemmy-tor";
            }
            proxy_pass $proxpass;

            rewrite ^(.+)/+$ $1 permanent;

            # Send actual client IP upstream
            proxy_set_header X-Real-IP $remote_addr;
            proxy_set_header Host $host;
            proxy_set_header X-Forwarded-For $proxy_add_x_forwarded_for;
        }

        # backend
        location ~ ^/(api|feeds|nodeinfo|.well-known) {
            proxy_pass "http://lemmy-tor";
            proxy_http_version 1.1;
            proxy_set_header Upgrade $http_upgrade;
            proxy_set_header Connection "upgrade";

            # Rate limit
            limit_req zone=HIDDEN_SERVICE_ADDR_ratelimit burst=30 nodelay;

            # Add IP forwarding headers
            proxy_set_header X-Real-IP $remote_addr;
            proxy_set_header Host $host;
            proxy_set_header X-Forwarded-For $proxy_add_x_forwarded_for;
        }

        # pictrs only - for adding browser cache control.
        location ~ ^/(pictrs) {
            # allow browser cache, images never update, we can apply long term cache
            expires 120d;
            add_header Pragma "public";
            add_header Cache-Control "public";

            proxy_pass "http://lemmy-tor";
            proxy_http_version 1.1;
            proxy_set_header Upgrade $http_upgrade;
            proxy_set_header Connection "upgrade";

            # Rate limit
            limit_req zone=HIDDEN_SERVICE_ADDR_ratelimit burst=30 nodelay;

            # Add IP forwarding headers
            proxy_set_header X-Real-IP $remote_addr;
            proxy_set_header Host $host;
            proxy_set_header X-Forwarded-For $proxy_add_x_forwarded_for;
        }

        # Redirect pictshare images to pictrs
        location ~ /pictshare/(.*)$ {
            return 301 /pictrs/image/$1;
        }
    }

    # ...
}
Apply the configuration(s)
Restart all services associated with your Lemmy instance:
docker compose down
docker compose up -d
Test connectivity over Tor
Using torsocks, verify your hidden service is available on the Tor network.
torsocks curl -vI http://HIDDEN_SERVICE_ADDR
*   Trying 127.*.*.*:80...
* Connected to HIDDEN_SERVICE_ADDR (127.*.*.*) port 80 (#0)
> HEAD / HTTP/1.1
> Host: HIDDEN_SERVICE_ADDR
> User-Agent: curl/7.76.1
> Accept: */*
>
* Mark bundle as not supporting multiuse
< HTTP/1.1 200 OK
HTTP/1.1 200 OK
< Server: nginx
Server: nginx
< Date: Wed, 07 Jun 2023 17:06:00 GMT
Date: Wed, 07 Jun 2023 17:06:00 GMT
< Content-Type: text/html; charset=utf-8
Content-Type: text/html; charset=utf-8
< Content-Length: 98487
Content-Length: 98487
< Connection: keep-alive
Connection: keep-alive
< Vary: Accept-Encoding
Vary: Accept-Encoding
< X-Powered-By: Express
X-Powered-By: Express
< Content-Security-Policy: default-src 'self'; manifest-src *; connect-src *; img-src * data:; script-src 'self' 'unsafe-inline' 'unsafe-eval'; style-src 'self' 'unsafe-inline'; form-action 'self'; base-uri 'self'; frame-src *
Content-Security-Policy: default-src 'self'; manifest-src *; connect-src *; img-src * data:; script-src 'self' 'unsafe-inline' 'unsafe-eval'; style-src 'self' 'unsafe-inline'; form-action 'self'; base-uri 'self'; frame-src *
< ETag: W/"180b7-EC9iFYAIlbnN8zHCayBwL3wAm64"
ETag: W/"180b7-EC9iFYAIlbnN8zHCayBwL3wAm64"
< Referrer-Policy: same-origin
Referrer-Policy: same-origin
< X-Content-Type-Options: nosniff
X-Content-Type-Options: nosniff
< X-Frame-Options: DENY
X-Frame-Options: DENY
< X-XSS-Protection: 1; mode=block
X-XSS-Protection: 1; mode=block

<
* Connection #0 to host HIDDEN_SERVICE_ADDR left intact
Logging behavior
Hidden service traffic will appear to originate from the lemmyexternalproxy docker network instead of an internet IP. Docker’s default network address pool is 172.17.0.0/16.
docker compose logs -f proxy
lemmy-proxy-1  | 172.*.0.1 - -  # ...
lemmy-proxy-1  | 172.*.0.1 - -  # ...
lemmy-proxy-1  | 172.*.0.1 - -  # ...
Prometheus Metrics
Lemmy supports the export of metrics in the Prometheus format. This document outlines how to enable the feature and begin collecting metrics.
Configuration
Configuration of the Prometheus endpoint is contained under the optional
prometheus object in the lemmy.hjson file. In this configuration block, the
bind address and port of the Prometheus metrics server can be configured.
By default, it will serve on 127.0.0.1:10002. If running inside a container,
it should instead bind on all addresses as below.
prometheus: {
  bind: "0.0.0.0"
  port: 10002
}
Scrape
After Lemmy has been deployed, test that it is serving properly (substitute the correct hostname if not running locally).
curl localhost:10002/metrics
Prometheus Configuration
Below is a minimal configuration on the Prometheus server’s side that will scrape the metrics from Lemmy.
global:
scrape_configs:
  - job_name: lemmy
    scrape_interval: 1m
    static_configs:
      - targets:
          - localhost:10002
Then run a Prometheus server to scrape the metrics.
docker run -p 9090:9090 -v prometheus.yml:/etc/prometheus/prometheus.yml prom/prometheus
If Lemmy was deployed using the docker-compose.yml, then use the following
configurations instead.
global:
scrape_configs:
  - job_name: lemmy
    scrape_interval: 1m
    static_configs:
      - targets:
          - lemmy:10002
Run the Prometheus server inside the same docker network that Lemmy is running
in. This can be discovered by running docker inspect on the lemmy container.
docker run -p 9090:9090 -v prometheus.yml:/etc/prometheus/prometheus.yml --network $LEMMY_NETWORK prom/prometheus
Example
Below is an example of what is returned from the /metrics endpoint. Each
combination of endpoint, method, and status will produce a histogram
(lemmy_api_http_requests_duration_seconds_*), so for brevity the output was
reduced to a single endpoint.
For the HTTP metrics, this is saying that /api/v3/post/list received 12 GET
requests that returned a 200 HTTP code. Cumulatively, these requests took
0.383 seconds. 5 requests completed between 0.01 and 0.025 seconds. 5 more
completed between 0.025 and 0.05 seconds. And the remaining 2 requests completed
between 0.05 and 0.1 seconds.
lemmy_api_http_requests_duration_seconds_bucket{endpoint="/api/v3/post/list",method="GET",status="200",le="0.005"} 0
lemmy_api_http_requests_duration_seconds_bucket{endpoint="/api/v3/post/list",method="GET",status="200",le="0.01"} 0
lemmy_api_http_requests_duration_seconds_bucket{endpoint="/api/v3/post/list",method="GET",status="200",le="0.025"} 5
lemmy_api_http_requests_duration_seconds_bucket{endpoint="/api/v3/post/list",method="GET",status="200",le="0.05"} 10
lemmy_api_http_requests_duration_seconds_bucket{endpoint="/api/v3/post/list",method="GET",status="200",le="0.1"} 12
lemmy_api_http_requests_duration_seconds_bucket{endpoint="/api/v3/post/list",method="GET",status="200",le="0.25"} 12
lemmy_api_http_requests_duration_seconds_bucket{endpoint="/api/v3/post/list",method="GET",status="200",le="0.5"} 12
lemmy_api_http_requests_duration_seconds_bucket{endpoint="/api/v3/post/list",method="GET",status="200",le="1"} 12
lemmy_api_http_requests_duration_seconds_bucket{endpoint="/api/v3/post/list",method="GET",status="200",le="2.5"} 12
lemmy_api_http_requests_duration_seconds_bucket{endpoint="/api/v3/post/list",method="GET",status="200",le="5"} 12
lemmy_api_http_requests_duration_seconds_bucket{endpoint="/api/v3/post/list",method="GET",status="200",le="10"} 12
lemmy_api_http_requests_duration_seconds_bucket{endpoint="/api/v3/post/list",method="GET",status="200",le="+Inf"} 12
lemmy_api_http_requests_duration_seconds_sum{endpoint="/api/v3/post/list",method="GET",status="200"} 0.3834808429999999
lemmy_api_http_requests_duration_seconds_count{endpoint="/api/v3/post/list",method="GET",status="200"} 12

lemmy_api_http_requests_total{endpoint="/api/v3/post/list",method="GET",status="200"} 12

# HELP lemmy_db_pool_available_connections Number of available connections in the pool
# TYPE lemmy_db_pool_available_connections gauge
lemmy_db_pool_available_connections 2
# HELP lemmy_db_pool_connections Current number of connections in the pool
# TYPE lemmy_db_pool_connections gauge
lemmy_db_pool_connections 2
# HELP lemmy_db_pool_max_connections Maximum number of connections in the pool
# TYPE lemmy_db_pool_max_connections gauge
lemmy_db_pool_max_connections 5

# HELP process_cpu_seconds_total Total user and system CPU time spent in seconds.
# TYPE process_cpu_seconds_total counter
process_cpu_seconds_total 14
# HELP process_max_fds Maximum number of open file descriptors.
# TYPE process_max_fds gauge
process_max_fds 1073741816
# HELP process_open_fds Number of open file descriptors.
# TYPE process_open_fds gauge
process_open_fds 91
# HELP process_resident_memory_bytes Resident memory size in bytes.
# TYPE process_resident_memory_bytes gauge
process_resident_memory_bytes 75603968
# HELP process_start_time_seconds Start time of the process since unix epoch in seconds.
# TYPE process_start_time_seconds gauge
process_start_time_seconds 1688487611
# HELP process_threads Number of OS threads in the process.
# TYPE process_threads gauge
process_threads 37
# HELP process_virtual_memory_bytes Virtual memory size in bytes.
# TYPE process_virtual_memory_bytes gauge
process_virtual_memory_bytes 206000128
Visualizing Metrics
Grafana can be used to visualize the metrics collected by Prometheus. A community-maintained Grafana dashboard for Lemmy is available on the Grafana dashboard registry.
Dashboard: Lemmy – Grafana Dashboards
Before importing the dashboard, add Prometheus as a data source in Grafana:
- In Grafana, go to Connections → Data sources.
- Click Add new data source, and select Prometheus.
- Set the server URL to your Prometheus instance (e.g.
http://localhost:10002). - Click Save & test to confirm the connection.
To use it:
- In your Grafana instance, go to Dashboards → Import.
- Enter the ID
25020or paste the dashboard URL. - Select your Prometheus data source and click Import.
The dashboard provides an overview of HTTP request rates and latencies, database connection pool usage, and process-level metrics such as CPU, memory, and open file descriptors.
Horizontal Scaling
This is a collection of notes on scaling different Lemmy components horizontally. This is not meant as a step-by-step guide, rather as general tips and knowledge that might be useful to somebody who is already familiar with and horizontal scaling concepts and best practices. If you don’t already know about concepts like load balancing, object storage, and reverse proxies, then this document will probably be hard (or impossible) to understand.
Note: scaling Lemmy this way is not necessary, and for small instances, the added overhead most likely outweighs any benefits.
Why scale horizontally?
- If one of your Lemmy servers dies for any reason, your instance can still remain operational
- Having multiple Lemmy servers allows you to do rolling upgrades (no downtime needed to upgrade Lemmy!)
- Horizontal scaling provides additional flexibility in how you upgrade your infrastructure
- As of Lemmy version 0.18.2, Lemmy appears to be able to use the same resources more efficiently if they are split between multiple Lemmy processes
Breakdown of Lemmy components
See Lemmy components for a high level overview of what each component does.
Lemmy-ui
Lemmy-ui can be horizontally scaled, but make sure you read the following section for information about rolling upgrades.
Rolling upgrades
In general, there is nothing preventing you from running multiple load balanced Lemmy-ui servers in parallel, but without some custom configuration, rolling upgrades will break Lemmy for your users! This is because by default, Lemmy-ui will serve static files through the express process.
Consider the scenario where you have 2 Lemmy-ui servers, one is running on version 1, and the other has just come online running version 2. A user opening your Lemmy in their browser might have their front page html request routed to version 1. This html will contain a reference to many other static files which are specific to version 1. Most likely, some of these requests will get routed to the server running version 2. The files will not exist on this server, the server will respond with 404, and the UI will remain in a broken state.
There are a few ways to work around this issue:
-
The safest option is to ensure that all servers are able to serve static files for all currently active Lemmy-ui versions.
- There are many ways to achieve this, the most obvious one being to upload your static files to object storage, and have reverse proxies route static file requests to your static files bucket.
- Here’s one possible example of how to do this with nginx:
location /static {
   expires 1y;
   add_header Cache-Control "public";
   proxy_pass https://${bucket_fqdn};

   limit_except GET {
       deny  all;
   }

   proxy_intercept_errors on;
   # invalid keys result in 403
   error_page 403 =404 /@404static;
}
Replace
${bucket_fqdn}with the URL to your bucket. With this setup, you should upload the contents of the lemmy-uidist/directory to a “directory” namedstatic/$LEMMY_UI_HASHin your bucket, where the hash is calculated from the commit you are deploying:export LEMMY_UI_HASH=$(git rev-parse --short HEAD). Note that this setup requires public acl on uploaded files, so it’s recommended to limit access to your bucket with an IP allowlist policy. -
An alternative option is to configure sticky sessions in your load balancer. This will ensure that subsequent requests all end up on the same Lemmy-ui server, and as long as your sticky sessions last longer than your upgrade process, most clients should remain functional.
-
Similarly to sticky sessions, another possibility is to configure ip hash based load balancing.
-
There is always the option to just employ downtime and upgrade all servers at once (but that’s not very fun!)
Lemmy_server
Lemmy_server can be horizontally scaled, with a few caveats.
Here’s a quick example on how you could start 3 web servers, 3 federation servers and one scheduled task process:
# scheduled tasks
lemmy_server --disable-http-server --disable-activity-sending
Or run the Docker container with the -e LEMMY_DISABLE_HTTP_SERVER=true and -e LEMMY_DISABLE_ACTIVITY_SENDING=true ENV parameters.
# 3 http servers
lemmy_server --disable-activity-sending --disable-scheduled-tasks
lemmy_server --disable-activity-sending --disable-scheduled-tasks
lemmy_server --disable-activity-sending --disable-scheduled-tasks
Or run the Docker containers with the -e LEMMY_DISABLE_ACTIVITY_SENDING=true and -e LEMMY_DISABLE_SCHEDULED_TASKS=true ENV parameters.
# 3 servers for sending out federation activities
lemmy_server --disable-http-server --disable-scheduled-tasks --federate-process-index=1 --federate-process-count=3
lemmy_server --disable-http-server --disable-scheduled-tasks --federate-process-index=2 --federate-process-count=3
lemmy_server --disable-http-server --disable-scheduled-tasks --federate-process-index=3 --federate-process-count=3
Or run the Docker containers with the -e LEMMY_DISABLE_HTTP_SERVER=true, -e LEMMY_DISABLE_SCHEDULED_TASKS=true, -e LEMMY_FEDERATE_PROCESS_INDEX=1 and -e LEMMY_FEDERATE_PROCESS_COUNT=3 ENV parameters.
Scheduled tasks
By default, a Lemmy_server process will run background scheduled tasks, which must be run only on one server. Launching multiple processes with the default configuration will result in multiple duplicated scheduled tasks all starting at the same moment and trying to do the same thing at once.
To solve this, Lemmy must be started with the --disable-scheduled-tasks flag (or LEMMY_DISABLE_SCHEDULED_TASKS=true) on all but one instance. In general, there are two approaches:
- Run all your load balanced Lemmy servers with the
--disable-scheduled-tasksflag, and run one additional Lemmy server without this flag which is not in your load balancer and does not accept any HTTP traffic. - Run one load balanced Lemmy server without the flag, and all other load balanced servers with the flag.
Federation queue
The persistent federation queue (since 0.19) is split by federated domain and can be processed in equal-size parts run in separate processes. To split the queue up into N processes numbered 1…N, use the arguments --federate-process-index=i --federate-process-count=N on each (or LEMMY_FEDERATE_PROCESS_INDEX=i and LEMMY_FEDERATE_PROCESS_COUNT=N respectively). It is important that each index is is given to exactly one process, otherwise you will get undefined behaviour (missing, dupe federation, crashes).
Federation processes can be started and stopped at will. They will restart federation to each instance from the last transmitted activity regardless of downtime.
Rolling upgrades
For most versions, rolling releases have been completely OK, but there have been some cases where a database migration slips in which is NOT backwards compatible (causing any servers running the older version of Lemmy to potentially start generating errors). To be safe, you should always first take a look at what database migrations are included in a new version, and evaluate whether the changes are for sure safe to apply with running servers.
Note that even if there are no backwards incompatible migrations between immediate version upgrades (version 1 -> 2 is safe and 2 -> 3 is safe), doing bigger upgrades might cause these same migrations to become backwards incompatible (a server running version 1 might not be compatible with migrations from version 3 in this scenario). It is generally best to only upgrade one version at a time!.
For the scheduled task process, it shouldn’t cause any major issues to have two servers running in parallel for a short duration during an upgrade, but shutting the old one down before starting the new one will always be safer.
Pict-rs
Pict-rs does not scale horizontally as of writing this document. This is due to a dependency on a Sled database, which is a disk based database file.
The developer of pict-rs has mentioned plans to eventually add Postgres support (which should in theory enable horizontal scaling), but work on this has not yet started.
Note that by caching pict-rs images (for example, with nginx, or with a CDN), you can really minimize load on the pict-rs server!
Other tips
-
Your lemmy-ui servers need to access your backend as well. If you don’t want a complicated setup with multiple load balancers, you could just have each of your servers contain nginx, lemmy-ui, and lemmy_server, and just load balance to an nginx on each of your servers
-
Make sure you’re passing the real client ip address to Lemmy, otherwise Lemmy’s built in rate limiter will trigger very often (if it rate limits based on your load balancer’s IP address, for example). With nginx, you should use something like this in your nginx.conf:
real_ip_recursive on; real_ip_header X-Forwarded-For; set_real_ip_from <your load balancer ip here>; -
The internal Lemmy load balancer works based on an in-memory storage of ip addresses. That means that by adding more Lemmy servers, you are effectively making your rate limits less strict. If you rely on the built in limiter, make sure to adjust the limits accordingly!
Overview
Lemmy is an open source project and relies on community contributions to get better. Development happens mainly in the Lemmy Github repositories. Communication is done over Matrix.
These are the main repositories which are relevant for contributors:
- lemmy: The backend which is the core of Lemmy. It implements SQL queries, provides the API and handles ActivityPub federation. Additionally it sends emails and provides RSS feeds. Written in Rust with actix-web and diesel. The issue tracker is also used for general enhancements which affect multiple repositories.
- lemmy-ui: The main frontend for Lemmy. It provides the user interface that you see when viewing a Lemmy instance. Written in Typescript and CSS with the Inferno framework.
- lemmy-ansible: Automated installation method which is recommended for users without technical knowledge.
- joinlemmy-site: Source code for the official project website join-lemmy.org. Landing page for new users which includes general information and a list of instances.
- lemmy-js-client: Client for the Lemmy API which is used by lemmy-ui. Can also be used by other projects to get started more easily.
- activitypub-federation-rust: High-level framework for ActivityPub federation in Rust. Was originally part of the Lemmy code, but was extracted and made more generic so that other projects can use it too.
There are many different ways to contribute, depending on your skills and interests:
Reporting issues
You may notice different problems or potential improvements when using Lemmy. You can report them in the relevant repository. Make sure to first search the issue tracker to avoid duplicates. When creating the issue, fill in the template and include as much relevant information as possible.
Translating
Use Weblate to help translate Lemmy into different languages.
Programming and Design
You can open a pull request to make changes to Lemmy. In case of bigger contributions it is recommended to discuss it in an issue first. See the next sections for instructions to compile and develop the projects.
Donating
Besides contributing with your time, you can also consider making a donation to support the developers.
Local Development
Install build requirements
Install the latest Rust version using rustup.
Debian-based distro:
sudo apt install git cargo pkg-config libpq-dev curl jq
Arch-based distro:
sudo pacman -S git cargo pkg-config postgresql-libs curl jq
Fedora-based distro:
sudo dnf install git cargo pkg-config libpq-devel curl postgresql-server postgresql-contrib jq
macOS:
Install Homebrew if you don’t already have it installed. Then install Node and pnpm.
brew install node
Install pnpm
The install instructions are here, or you can run
npm install -g pnpm
Setup PostgreSQL database
Debian-based distro:
sudo apt install postgresql
sudo systemctl start postgresql
Arch-based distro:
sudo pacman -S postgresql
sudo systemctl start postgresql
# If the systemctl command errors, then run the following
sudo mkdir /var/lib/postgres/data
sudo chown postgres:postgres /var/lib/postgres/data
sudo -u postgres initdb -D /var/lib/postgres/data
sudo systemctl start postgresql
macOS:
brew install postgresql
brew services start postgresql
$(brew --prefix postgresql)/bin/createuser -s postgres
Either execute scripts/db-init.sh, or manually initialize the postgres database:
psql -c "create user lemmy with password 'password' superuser;" -U postgres
psql -c 'create database lemmy with owner lemmy;' -U postgres
export LEMMY_DATABASE_URL=postgres://lemmy:password@localhost:5432/lemmy
Code formatting tools
Taplo
See installation instructions here, or run
cargo install taplo-cli --locked
pg_format
Debian-based distro:
sudo apt install pgformatter
Arch-based distro:
sudo pacman -S pgformatter
macOS:
brew install pgformatter
Get the code
Clone frontend and backend code to local folders. Be sure to include --recursive to initialize git submodules.
git clone https://github.com/LemmyNet/lemmy.git --recursive
git clone https://github.com/LemmyNet/lemmy-ui.git --recursive
Backend development
Use cargo check to find compilation errors. To start the Lemmy backend, run cargo run. It will bind to 0.0.0.0:8536.
After making changes, you need to format the code with cargo +nightly fmt --all and run the linter with ./scripts/lint.sh.
If you’d like to speed up compilation times, you can install mold, and sccache, then add the following to ~/.cargo/config.toml. Note that the parameter -Zthreads=x only works on nightly Rust.
[build]
rustc-wrapper = "/usr/bin/sccache"

[target.x86_64-unknown-linux-gnu]
linker = "clang"
rustflags = ["-C", "link-arg=-fuse-ld=/usr/bin/mold", "-Z", "threads=16"]
To make changes to the database schema:
- Add a new migration in the migrations folder. This is most easily done by running
diesel migration generatethen editing the added files. - Run
./scripts/update_schema_file.sh.
Frontend development
Install dependencies by running pnpm i. Then run pnpm dev to launch lemmy-ui locally. It automatically connects to the Lemmy backend on localhost:8536. Open localhost:1234 in your browser. The project is rebuilt automatically when you change any files.
Note that this setup doesn’t support image uploads. If you want to test those, you need to use the Docker development.
Tests
Run Rust unit tests:
./scripts/test.sh
To run federation/API tests, first add the following lines to /etc/hosts:
127.0.0.1       lemmy-alpha
127.0.0.1       lemmy-beta
127.0.0.1       lemmy-gamma
127.0.0.1       lemmy-delta
127.0.0.1       lemmy-epsilon
Then run the following script:
cd api_tests
./run-federation-test.sh
Docker Development
Dependencies
Debian-based distro:
sudo apt install git docker-compose
sudo systemctl start docker
git clone https://github.com/LemmyNet/lemmy --recursive
Arch-based distro:
sudo pacman -S git docker-compose
sudo systemctl start docker
Get the code with submodules:
git clone https://github.com/LemmyNet/lemmy --recursive
Building
Use these commands to create a custom container based on your local branch and tagged accordingly.
This is useful if you want to modify the source code of your instance to add some extra functionalities which are not available in the main release.
sudo docker build . -f docker/Dockerfile --build-arg RUST_RELEASE_MODE=release -t "lemmy:${git rev-parse --abbrev-ref HEAD}"
Build Troubleshooting
In case the build fails, the following might help resolve it
Translations missing
If you see an error like this
Error: FileRead { file: "translations/email/en.json", source: Os { code: 2, kind: NotFound, message: "No such file or directory" } }
Try these commands
git submodule init && git submodule update
Then try building again
Running custom build on your server
If you want a custom docker build to run on your instance via docker, you don’t need to upload to a container repository, you can upload directly from your PC through ssh.
The following commands will copy the file to your instance and then load it onto your server’s container registry
LEMMY_SRV=lemmy.example.com # Add the FQDN, IP or hostname of your lemmy server here
# We store in /tmp to avoid putting it in our local branch and committing it by mistake
sudo docker save -o /tmp/customlemmy.tar lemmy:${git rev-parse --abbrev-ref HEAD}
# We change permissios to allow our normal user to read the file as root might not have ssh keys
sudo chown ${whoami} /tmp/${git rev-parse --abbrev-ref HEAD}
scp /tmp/customlemmy.tar ${LEMMY_SRV}:
ssh ${LEMMY_SRV}
# This command should be run while in your lemmy server as the user you uploaded
sudo docker load -i ${HOME}/customlemmy.tar
After the container is in your registry, simply change the docker-compose to have your own tag in the image key
image: lemmy:your_branch_name
Finally, reinitiate the container
docker-compose up -d
You should now be running your custom docker container.
Running
cd docker
./docker_update.sh
Then open localhost:1236 in your browser.
Building with Docker is relatively slow. To get faster builds you need to use local development instead.
Federation Development
The federation setup allows starting a few local Lemmy instances, to test federation functionality. You can start it with the following commands:
cd docker/federation
./start-local-instances.bash
The federation test sets up 5 instances:
| Instance | Admin username | Location | Notes |
|---|---|---|---|
| lemmy-alpha | lemmy_alpha | 127.0.0.1:8540 | federated with all other instances |
| lemmy-beta | lemmy_beta | 127.0.0.1:8550 | federated with all other instances |
| lemmy-gamma | lemmy_gamma | 127.0.0.1:8560 | federated with all other instances |
| lemmy-delta | lemmy_delta | 127.0.0.1:8570 | only allows federation with lemmy-beta |
| lemmy-epsilon | lemmy_epsilon | 127.0.0.1:8580 | uses blocklist, has lemmy-alpha blocked |
You can log into each using the instance name, and lemmylemmy as the password, IE (lemmy_alpha, lemmylemmy).
To start federation between instances, visit one of them and search for a user, community or post, like this. Note that the Lemmy backend runs on a different port than the frontend, so you have to increment the port number from the URL bar by one.
http://lemmy-gamma:8561/u/lemmy-gammahttp://lemmy-alpha:8541/c/mainhttp://lemmy-beta:8551/post/3
API
Lemmy has OpenAPI and javascript client docs, for app and client developers.
Instead of using the API directly you can use one of the existing libraries. You can either interact with a local development instance via http://localhost:8536, or connect to a production instance. The following instances are available for testing purposes:
- https://enterprise.lemmy.ml/
- https://ds9.lemmy.ml/
- https://voyager.lemmy.ml/
Other unofficial API documentation is available at:
Curl Examples
GET example
The current API {version} is here.
curl "https://lemmy.ml/api/{version}/community/list?sort=Hot"`
POST example
curl -i -H \
"Content-Type: application/json" \
-X POST \
-d '{
  "comment_id": 374,
  "score": 1,
  "auth": eyJ0eXAiOiJKV1QiLCJhbGciOiJIUzI1NiJ9.eyJpZCI6MiwiaXNzIjoidGVzdC5sZW1teS5tbCJ9.P77RX_kpz1a_geY5eCp29sl_5mAm-k27Cwnk8JcIZJk
}' \
https://lemmy.ml/api/{version}/comment/like
RSS/Atom feeds
These links can added by clicking on RSS icons in lemmy-ui.
| Type | url |
|---|---|
| All | /feeds/all.xml?sort=Hot |
| Local | /feeds/local.xml?sort=Hot |
| Community | /feeds/c/community-name.xml?sort=Hot |
| User | /feeds/u/user-name.xml?sort=Hot |
| Your front page | /feeds/front.xml/{jwt_token} |
| Your inbox | /feeds/inbox.xml/{jwt_token} |
| Your modlog | /feeds/modlog.xml/{jwt_token} |
Images
Lemmy forwards image requests to a locally running Pictrs.
GET /pictrs/image/{filename}?format={webp, jpg, ...}&thumbnail={96}
Format and thumbnail are optional.
Create (request)
Uploaded content must be valid multipart/form-data with an image array located within the images[] key.
POST /pictrs/image
Create (response)
{
  "files": [
    {
      "delete_token": "{token}",
      "file": "{file}.jpg"
    }
  ],
  "msg": "ok"
}
Delete
GET /pictrs/image/delete/{delete_token}/{file}
Rust API
If you want to develop a Rust application which interacts with Lemmy, you can directly pull in the relevant API structs. This uses the exact API structs used in Lemmy, but with most heavyweight dependencies disabled. API paths or HTTP client are not included, so you need to handle those aspects manually. See the readme for details.
Creating a Custom Frontend
The Lemmy backend and frontend are completely separate projects. This creates a lot of potential for alternative frontends which can change much of the design and user experience of Lemmy. For example, it is possible to create a frontend in the style of a traditional forum like phpBB, a question-and-answer site like Stack Overflow, a blogging platform or an image gallery. This way you don’t have to write any SQL queries, federation logic, API code and so on, but can use the proven implementation from Lemmy. It is also possible to run multiple frontends for a single Lemmy instance.
Development
The easiest way to get started is by forking one of the existing frontends. But you can also create a new frontend from scratch. In any case the principle is the same: bind to a port to serve user requests, and connect to the API of a Lemmy instance as described above to fetch data.
Translations
You can add the lemmy-translations repository to your project as a git submodule. That way you can take advantage of same translations used in the official frontend, and you will also receive new translations contributed via Weblate.
Rate limiting
Lemmy does rate limiting for many actions based on the client IP. But if you make any API calls on the server side (e.g. in the case of server-side rendering, or javascript pre-rendering), Lemmy will take the IP of the Docker container. Meaning that all requests come from the same IP, and get rate limited much earlier. To avoid this problem, you need to pass the actual client IP via Forwarded or X-Forwarded-For HTTP header.
Federation
Lemmy uses the ActivityPub protocol for communication between servers. If you are unfamiliar with the protocol, you can start by reading the resource links. This document explains how to interact with it from other projects.
In Lemmy we use some specific terms to refer to ActivityPub items. They are essentially our specific implementations of well-known ActivityPub concepts:
- Community:
Group - User:
Person - Post:
Page - Comment:
Note
Almost every action in Lemmy happens inside a group. The Federation Enhancement Proposal Group Federation gives a high-level overview how this works. The generic federation logic is implemented in the activitypub-federation library. It can also be used by other Rust projects.
Sometimes you will see a notation like Create/Note. This refers to a Create activity with a Note as object.
Below are explanations and examples for all actors, objects and activities from Lemmy. These include many optional fields which you can safely ignore.
If you have trouble to make your project federate with Lemmy, feel free to open an issue. Make sure to include the specific federation messages you are sending, and any errors returned by Lemmy.
Context
"@context": [
    "https://join-lemmy.org/context.json",
    "https://www.w3.org/ns/activitystreams"
],
The context is identical for all activities and objects.
Actors
Community
An automated actor. Users can send posts or comments to it, which the community forwards to its followers in the form of Announce.
{
  "id": "https://enterprise.lemmy.ml/c/tenforward",
  "type": "Group",
  "preferredUsername": "tenforward",
  "name": "Ten Forward",
  "summary": "<p>Lounge and recreation facility</p>\n<hr />\n<p>Welcome to the <a href=\"https://memory-alpha.fandom.com/wiki/USS_Enterprise_(NCC-1701-D)\">Enterprise</a>!.</p>\n",
  "source": {
    "content": "Lounge and recreation facility\n\n---\n\nWelcome to the [Enterprise](https://memory-alpha.fandom.com/wiki/USS_Enterprise_(NCC-1701-D))!.",
    "mediaType": "text/markdown"
  },
  "sensitive": false,
  "icon": {
    "type": "Image",
    "url": "https://enterprise.lemmy.ml/pictrs/image/waqyZwLAy4.webp"
  },
  "image": {
    "type": "Image",
    "url": "https://enterprise.lemmy.ml/pictrs/image/Wt8zoMcCmE.jpg"
  },
  "inbox": "https://enterprise.lemmy.ml/c/tenforward/inbox",
  "followers": "https://enterprise.lemmy.ml/c/tenforward/followers",
  "attributedTo": "https://enterprise.lemmy.ml/c/tenforward/moderators",
  "featured": "https://enterprise.lemmy.ml/c/tenforward//featured",
  "postingRestrictedToMods": false,
  "endpoints": {
    "sharedInbox": "https://enterprise.lemmy.ml/inbox"
  },
  "outbox": "https://enterprise.lemmy.ml/c/tenforward/outbox",
  "publicKey": {
    "id": "https://enterprise.lemmy.ml/c/tenforward#main-key",
    "owner": "https://enterprise.lemmy.ml/c/tenforward",
    "publicKeyPem": "-----BEGIN PUBLIC KEY-----\nMIIBIjANBgkqhkiG9w0BAQEFAAOCAQ8AMIIBCgKCAQEAzRjKTNtvDCmugplwEh+g\nx1bhKm6BHUZfXfpscgMMm7tXFswSDzUQirMgfkxa9ubfr1PDFKffA2vQ9x6CyuO/\n70xTafdOHyV1tSqzgKz0ZvFZ/VCOo6qy1mYWVkrtBm/fKzM+87MdkKYB/zI4VyEJ\nLfLQgjwxBAEYUH3CBG71U0gO0TwbimWNN0vqlfp0QfThNe1WYObF88ZVzMLgFbr7\nRHBItZjlZ/d8foPDidlIR3l2dJjy0EsD8F9JM340jtX7LXqFmU4j1AQKNHTDLnUF\nwYVhzuQGNJ504l5LZkFG54XfIFT7dx2QwuuM9bSnfPv/98RYrq1Si6tCkxEt1cVe\n4wIDAQAB\n-----END PUBLIC KEY-----\n"
  },
  "language": [
    {
      "identifier": "fr",
      "name": "Français"
    },
    {
      "identifier": "de",
      "name": "Deutsch"
    }
  ],
  "published": "2019-06-02T16:43:50.799554Z",
  "updated": "2021-03-10T17:18:10.498868Z"
}
| Field Name | Description |
|---|---|
preferredUsername | Name of the actor |
name | Title of the community |
sensitive | True indicates that all posts in the community are nsfw |
attributedTo | First the community creator, then all the remaining moderators |
summary | Text for the community sidebar, usually containing a description and rules |
icon | Icon, shown next to the community name |
image | Banner image, shown on top of the community page |
inbox | ActivityPub inbox URL |
outbox | ActivityPub outbox URL, only contains up to 20 latest posts, no comments, votes or other activities |
followers | Follower collection URL, only contains the number of followers, no references to individual followers |
endpoints | Contains URL of shared inbox |
published | Datetime when the community was first created |
updated | Datetime when the community was last changed |
publicKey | The public key used to verify signatures from this actor |
User
A person, interacts primarily with the community where it sends and receives posts/comments. Can also create and moderate communities, and send private messages to other users. Can be followed from other platforms.
{
  "id": "https://enterprise.lemmy.ml/u/picard",
  "type": "Person",
  "preferredUsername": "picard",
  "name": "Jean-Luc Picard",
  "summary": "<p>Captain of the starship <strong>Enterprise</strong>.</p>\n",
  "source": {
    "content": "Captain of the starship **Enterprise**.",
    "mediaType": "text/markdown"
  },
  "icon": {
    "type": "Image",
    "url": "https://enterprise.lemmy.ml/pictrs/image/ed9ej7.jpg"
  },
  "image": {
    "type": "Image",
    "url": "https://enterprise.lemmy.ml/pictrs/image/XenaYI5hTn.png"
  },
  "matrixUserId": "@picard:matrix.org",
  "inbox": "https://enterprise.lemmy.ml/u/picard/inbox",
  "outbox": "https://enterprise.lemmy.ml/u/picard/outbox",
  "endpoints": {
    "sharedInbox": "https://enterprise.lemmy.ml/inbox"
  },
  "published": "2020-01-17T01:38:22.348392Z",
  "updated": "2021-08-13T00:11:15.941990Z",
  "publicKey": {
    "id": "https://enterprise.lemmy.ml/u/picard#main-key",
    "owner": "https://enterprise.lemmy.ml/u/picard",
    "publicKeyPem": "-----BEGIN PUBLIC KEY-----\nMIIBIjANBgkqhkiG9w0BAQEFAAOCAQ8AMIIBCgKCAQEA0lP99/s5Vv+XbPdkeqIJ\nwoD4GFnHmBnBHdEKChEUWfWj1TtioC/rGNoXFQeXQA3Amhy4nxSceiDnUgwkkuQY\nv0MtIW58NzgknEavtllxL+LSds5pg3gANaDIk8UiWTkqXTg0GnlJMpCK1Chen0l/\nszL6DEvUyTSuS5ZYDXFgewF89Pe7U0S15V5U2Harv7AgJYDyxmUL0D1pGuUCRqcE\nl5MTHJjrXeNnH1w2g8aly8YlO/Cr0L51rFg/lBF23vni7ZLv8HbmWh6YpaAf1R8h\nE45zKR7OHqymdjzrg1ITBwovefpwMkVgnJ+Wdr4HPnFlBSkXPoZeM11+Z8L0anzA\nXwIDAQAB\n-----END PUBLIC KEY-----\n"
  }
}
| Field Name | Description |
|---|---|
preferredUsername | Name of the actor |
name | The user’s displayname |
summary | User bio |
icon | The user’s avatar, shown next to the username |
image | The user’s banner, shown on top of the profile |
inbox | ActivityPub inbox URL |
endpoints | Contains URL of shared inbox |
published | Datetime when the user signed up |
updated | Datetime when the user profile was last changed |
publicKey | The public key used to verify signatures from this actor |
Instance
Represents a Lemmy instance, and is used to federate global data like the instance description or site bans. It can be fetched from the root path.
{
  "type": "Application",
  "id": "https://enterprise.lemmy.ml/",
  "name": "Enterprise",
  "preferredUsername": "enterprise.lemmy.ml",
  "summary": "A test instance",
  "content": "<p>Enterprise sidebar</p>\\n",
  "mediaType": "text/html",
  "source": {
    "content": "Enterprise sidebar",
    "mediaType": "text/markdown"
  },
  "inbox": "https://enterprise.lemmy.ml/inbox",
  "outbox": "https://enterprise.lemmy.ml/outbox",
  "publicKey": {
    "id": "https://enterprise.lemmy.ml/#main-key",
    "owner": "https://enterprise.lemmy.ml/",
    "publicKeyPem": "-----BEGIN PUBLIC KEY-----\nMIIBIjANBgkqhkiG9w0BAQEFAAOCAQ8AMIIBCgKCAQEAupcK0xTw5yQb/fnztAmb\n9LfPbhJJP1+1GwUaOXGYiDJD6uYJhl9CLmgztLl3RyV9ltOYoN8/NLNDfOMmgOjd\nrsNWEjDI9IcVPmiZnhU7hsi6KgQvJzzv8O5/xYjAGhDfrGmtdpL+lyG0B5fQod8J\n/V5VWvTQ0B0qFrLSBBuhOrp8/fTtDskdtElDPtnNfH2jn6FgtLOijidWwf9ekFo4\n0I1JeuEw6LuD/CzKVJTPoztzabUV1DQF/DnFJm+8y7SCJa9jEO56Uf9eVfa1jF6f\ndH6ZvNJMiafstVuLMAw7C/eNJy3ufXgtZ4403oOKA0aRSYf1cc9pHSZ9gDE/mevH\nLwIDAQAB\n-----END PUBLIC KEY-----\n"
  },
  "language": [
    {
      "identifier": "fr",
      "name": "Français"
    },
    {
      "identifier": "es",
      "name": "Español"
    }
  ],
  "published": "2022-01-19T21:52:11.110741Z"
}
| Field Name | Description |
|---|---|
name | Instance name |
summary | Short description |
content | Long description (sidebar) |
icon | Instance icon |
image | Instance banner |
inbox | ActivityPub inbox URL |
endpoints | Contains URL of shared inbox |
published | Datetime when the instance was created |
updated | Datetime when the instance metadata |
publicKey | The public key used to verify signatures from this actor |
Objects
Post
A page with title, and optional URL and text content. The attachment URL often leads to an image, in which case a thumbnail is included. Each post belongs to exactly one community. Sent out as Page, but for receiving the types Article, Note, Video and Event are also accepted.
{
  "id": "https://enterprise.lemmy.ml/post/55143",
  "type": "Page",
  "attributedTo": "https://enterprise.lemmy.ml/u/picard",
  "to": [
    "https://enterprise.lemmy.ml/c/tenforward",
    "https://www.w3.org/ns/activitystreams#Public"
  ],
  "audience": "https://enterprise.lemmy.ml/c/tenforward",
  "name": "Post title",
  "content": "<p>This is a post in the /c/tenforward community</p>\n",
  "mediaType": "text/html",
  "source": {
    "content": "This is a post in the /c/tenforward community",
    "mediaType": "text/markdown"
  },
  "attachment": [
    {
      "type": "Link",
      "href": "https://enterprise.lemmy.ml/pictrs/image/eOtYb9iEiB.png"
    }
  ],
  "image": {
    "type": "Image",
    "url": "https://enterprise.lemmy.ml/pictrs/image/eOtYb9iEiB.png"
  },
  "sensitive": false,
  "language": {
    "identifier": "fr",
    "name": "Français"
  },
  "published": "2021-02-26T12:35:34.292626Z"
}
| Field Name | Description |
|---|---|
attributedTo | ID of the user which created this post |
to | ID of the community where it was posted to |
name | Title of the post (mandatory) |
content | Body of the post |
attachment | A single website or image link |
image | Thumbnail for url, only present if it is an image link |
commentsEnabled | False indicates that the post is locked, and no comments can be added |
sensitive | True marks the post as NSFW, blurs the thumbnail and hides it from users with NSFW setting disabled |
stickied | True means that it is shown on top of the community |
published | Datetime when the post was created |
updated | Datetime when the post was edited (not present if it was never edited) |
Comment
A reply to a post, or reply to another comment. Contains only text (including references to other users or communities). Lemmy displays comments in a tree structure.
{
  "id": "https://enterprise.lemmy.ml/comment/38741",
  "type": "Note",
  "attributedTo": "https://enterprise.lemmy.ml/u/picard",
  "to": ["https://www.w3.org/ns/activitystreams#Public"],
  "cc": [
    "https://enterprise.lemmy.ml/c/tenforward",
    "https://enterprise.lemmy.ml/u/picard"
  ],
  "audience": "https://enterprise.lemmy.ml/c/tenforward",
  "inReplyTo": "https://enterprise.lemmy.ml/post/55143",
  "content": "<p>first comment!</p>\n",
  "mediaType": "text/html",
  "source": {
    "content": "first comment!",
    "mediaType": "text/markdown"
  },
  "tag": [
    {
      "href": "https://enterprise.lemmy.ml/u/picard",
      "type": "Mention",
      "name": "@picard@enterprise.lemmy.ml"
    }
  ],
  "distinguished": false,
  "language": {
    "identifier": "fr",
    "name": "Français"
  },
  "published": "2021-03-01T13:42:43.966208Z",
  "updated": "2021-03-01T13:43:03.955787Z"
}
| Field Name | Description |
|---|---|
attributedTo | ID of the user who created the comment |
to | Community where the comment was made |
content | The comment text |
inReplyTo | ID of the parent object. In case of a top-level comment this is the post ID, in case of a nested comment it is the parent comment ID. |
published | Datetime when the comment was created |
updated | Datetime when the comment was edited (not present if it was never edited) |
Private Message
A direct message from one user to another. Can not include additional users. Threading is not implemented yet, so the inReplyTo field is missing.
{
  "id": "https://enterprise.lemmy.ml/private_message/1621",
  "type": "ChatMessage",
  "attributedTo": "https://enterprise.lemmy.ml/u/picard",
  "to": ["https://queer.hacktivis.me/users/lanodan"],
  "content": "<p>Hello hello, testing</p>\n",
  "mediaType": "text/html",
  "source": {
    "content": "Hello hello, testing",
    "mediaType": "text/markdown"
  },
  "published": "2021-10-21T10:13:14.597721Z"
}
| Field Name | Description |
|---|---|
attributedTo | ID of the user who created this private message |
to | ID of the recipient |
content | The text of the private message |
published | Datetime when the message was created |
updated | Datetime when the message was edited (not present if it was never edited) |
Collections
Community Outbox
{
  "type": "OrderedCollection",
  "id": "https://ds9.lemmy.ml/c/testcom/outbox",
  "totalItems": 2,
  "orderedItems": [
    {
      "actor": "https://ds9.lemmy.ml/c/testcom",
      "to": ["https://www.w3.org/ns/activitystreams#Public"],
      "object": {
        "actor": "https://ds9.lemmy.ml/u/nutomic",
        "to": ["https://www.w3.org/ns/activitystreams#Public"],
        "cc": ["https://ds9.lemmy.ml/c/testcom"],
        "type": "Create",
        "id": "http://ds9.lemmy.ml/activities/create/eee6a57a-622f-464d-b560-73ae1fcd3ddf",
        "object": {
          "type": "Page",
          "id": "https://ds9.lemmy.ml/post/2328",
          "attributedTo": "https://ds9.lemmy.ml/u/nutomic",
          "to": [
            "https://ds9.lemmy.ml/c/testcom",
            "https://www.w3.org/ns/activitystreams#Public"
          ],
          "name": "another outbox test",
          "mediaType": "text/html",
          "sensitive": false,
          "stickied": false,
          "published": "2021-11-18T17:19:45.895163Z"
        }
      },
      "cc": ["https://ds9.lemmy.ml/c/testcom/followers"],
      "type": "Announce",
      "id": "https://ds9.lemmy.ml/activities/announce/b204fe9f-b13d-4af2-9d22-239ac2d892e6"
    },
    {
      "actor": "https://ds9.lemmy.ml/c/testcom",
      "to": ["https://www.w3.org/ns/activitystreams#Public"],
      "object": {
        "actor": "https://ds9.lemmy.ml/u/nutomic",
        "to": ["https://www.w3.org/ns/activitystreams#Public"],
        "cc": ["https://ds9.lemmy.ml/c/testcom"],
        "type": "Create",
        "id": "http://ds9.lemmy.ml/activities/create/eee6a57a-622f-464d-b560-73ae1fcd3ddf",
        "object": {
          "type": "Page",
          "id": "https://ds9.lemmy.ml/post/2327",
          "attributedTo": "https://ds9.lemmy.ml/u/nutomic",
          "to": [
            "https://ds9.lemmy.ml/c/testcom",
            "https://www.w3.org/ns/activitystreams#Public"
          ],
          "name": "outbox test",
          "mediaType": "text/html",
          "sensitive": false,
          "stickied": false,
          "published": "2021-11-18T17:19:05.763109Z"
        }
      },
      "cc": ["https://ds9.lemmy.ml/c/testcom/followers"],
      "type": "Announce",
      "id": "https://ds9.lemmy.ml/activities/announce/c6c960ce-c8d8-4231-925e-3ba367468f18"
    }
  ]
}
The outbox only contains Create/Post activities for now.
Community Followers
{
  "id": "http://enterprise.lemmy.ml/c/main/followers",
  "type": "Collection",
  "totalItems": 3,
  "items": []
}
The followers collection is only used to expose the number of followers. Actor IDs are not included, to protect user privacy.
Community Moderators
List of moderators who can perform actions like removing posts or banning users.
{
  "type": "OrderedCollection",
  "id": "https://enterprise.lemmy.ml/c/tenforward/moderators",
  "orderedItems": ["https://enterprise.lemmy.ml/u/picard"]
}
Community Featured Posts
List of posts which are stickied in the community.
{
  "type": "OrderedCollection",
  "id": "https://ds9.lemmy.ml/c/main/featured",
  "totalItems": 2,
  "orderedItems": [
    {
      "type": "Page",
      "id": "https://ds9.lemmy.ml/post/2",
      "attributedTo": "https://ds9.lemmy.ml/u/lemmy_alpha",
      "to": [
        "https://ds9.lemmy.ml/c/main",
        "https://www.w3.org/ns/activitystreams#Public"
      ],
      "name": "test 2",
      "cc": [],
      "mediaType": "text/html",
      "attachment": [],
      "sensitive": false,
      "published": "2023-02-06T06:42:41.939437Z",
      "language": {
        "identifier": "de",
        "name": "Deutsch"
      },
      "audience": "https://ds9.lemmy.ml/c/main"
    },
    {
      "type": "Page",
      "id": "https://ds9.lemmy.ml/post/1",
      "attributedTo": "https://ds9.lemmy.ml/u/lemmy_alpha",
      "to": [
        "https://ds9.lemmy.ml/c/main",
        "https://www.w3.org/ns/activitystreams#Public"
      ],
      "name": "test 1",
      "cc": [],
      "mediaType": "text/html",
      "attachment": [],
      "sensitive": false,
      "published": "2023-02-06T06:42:37.119567Z",
      "language": {
        "identifier": "de",
        "name": "Deutsch"
      },
      "audience": "https://ds9.lemmy.ml/c/main"
    }
  ]
}
User Outbox
Only contains totalItems count, but no actual items for privacy reasons.
{
  "type": "OrderedCollection",
  "id": "http://ds9.lemmy.ml/u/lemmy_alpha/outbox",
  "orderedItems": [],
  "totalItems": 0
}
Activities
User to Community
Follow
Each Community page has a “Follow” button. Clicking this triggers a Follow activity to be sent from the user to the Community inbox. The Community will automatically respond with an Accept/Follow activity to the user inbox. It will also add the user to its list of followers, and deliver any activities about Posts/Comments in the Community to the user.
{
  "actor": "http://ds9.lemmy.ml/u/lemmy_alpha",
  "to": ["http://enterprise.lemmy.ml/c/main"],
  "object": "http://enterprise.lemmy.ml/c/main",
  "type": "Follow",
  "id": "http://ds9.lemmy.ml/activities/follow/6abcd50b-b8ca-4952-86b0-a6dd8cc12866"
}
Unfollow
After following a Community, the “Follow” button is replaced by “Unfollow”. Clicking this sends an Undo/Follow activity to the Community inbox. The Community removes the User from its followers list and doesn’t send any activities to it anymore.
{
  "actor": "http://ds9.lemmy.ml/u/lemmy_alpha",
  "to": ["http://enterprise.lemmy.ml/c/main"],
  "object": {
    "actor": "http://ds9.lemmy.ml/u/lemmy_alpha",
    "to": ["http://enterprise.lemmy.ml/c/main"],
    "object": "http://enterprise.lemmy.ml/c/main",
    "type": "Follow",
    "id": "http://ds9.lemmy.ml/activities/follow/dc2f1bc5-f3a0-4daa-a46b-428cbfbd023c"
  },
  "type": "Undo",
  "id": "http://ds9.lemmy.ml/activities/undo/dd83c482-8ebd-4b6c-9008-c8373bd1a86a"
}
Create or Update Post
When a user creates a new post, it is sent to the respective community as Create/Page. Editing a previously created post sends an almost identical activity, except the type being Update.
{
  "actor": "http://ds9.lemmy.ml/u/lemmy_alpha",
  "to": ["https://www.w3.org/ns/activitystreams#Public"],
  "object": {
    "type": "Page",
    "id": "http://ds9.lemmy.ml/post/1",
    "attributedTo": "http://ds9.lemmy.ml/u/lemmy_alpha",
    "to": [
      "http://enterprise.lemmy.ml/c/main",
      "https://www.w3.org/ns/activitystreams#Public"
    ],
    "audience": "https://enterprise.lemmy.ml/c/main",
    "name": "test post",
    "content": "<p>test body</p>\n",
    "mediaType": "text/html",
    "source": {
      "content": "test body",
      "mediaType": "text/markdown"
    },
    "attachment": [
      {
        "type": "Link",
        "href": "https://lemmy.ml/pictrs/image/xl8W7FZfk9.jpg"
      }
    ],
    "sensitive": false,
    "language": {
      "identifier": "ko",
      "name": "한국어"
    },
    "published": "2021-10-29T15:10:51.557399Z"
  },
  "cc": ["http://enterprise.lemmy.ml/c/main"],
  "audience": "https://enterprise.lemmy.ml/c/main",
  "type": "Create",
  "id": "http://ds9.lemmy.ml/activities/create/eee6a57a-622f-464d-b560-73ae1fcd3ddf"
}
Create or Update Comment
A reply to a post, or to another comment as Create/Note. Can contain mentions of other users. Editing a previously created post sends an almost identical activity, except the type being Update.
The origin instance also scans the Comment for any User mentions, and sends the Create/Note to
those Users as well.
{
  "actor": "http://ds9.lemmy.ml/u/lemmy_alpha",
  "to": ["https://www.w3.org/ns/activitystreams#Public"],
  "object": {
    "type": "Note",
    "id": "http://ds9.lemmy.ml/comment/1",
    "attributedTo": "http://ds9.lemmy.ml/u/lemmy_alpha",
    "to": ["https://www.w3.org/ns/activitystreams#Public"],
    "cc": [
      "http://enterprise.lemmy.ml/c/main",
      "http://ds9.lemmy.ml/u/lemmy_alpha"
    ],
    "audience": "http://ds9.lemmy.ml/u/lemmy_alpha",
    "content": "hello",
    "mediaType": "text/html",
    "source": {
      "content": "hello",
      "mediaType": "text/markdown"
    },
    "inReplyTo": "http://ds9.lemmy.ml/post/1",
    "published": "2021-11-01T11:45:49.794920Z"
  },
  "cc": [
    "http://enterprise.lemmy.ml/c/main",
    "http://ds9.lemmy.ml/u/lemmy_alpha"
  ],
  "audience": "http://ds9.lemmy.ml/u/lemmy_alpha",
  "tag": [
    {
      "href": "http://ds9.lemmy.ml/u/lemmy_alpha",
      "type": "Mention",
      "name": "@lemmy_alpha@ds9.lemmy.ml"
    }
  ],
  "type": "Create",
  "id": "http://ds9.lemmy.ml/activities/create/1e77d67c-44ac-45ed-bf2a-460e21f60236"
}
Like Post or Comment
An upvote for a post or comment.
{
  "actor": "http://ds9.lemmy.ml/u/lemmy_alpha",
  "object": "http://ds9.lemmy.ml/comment/1",
  "audience": "https://enterprise.lemmy.ml/c/tenforward",
  "type": "Like",
  "id": "http://ds9.lemmy.ml/activities/like/fd61d070-7382-46a9-b2b7-6bb253732877"
}
Dislike Post or Comment
A downvote for a post or comment.
{
  "actor": "http://enterprise.lemmy.ml/u/lemmy_beta",
  "object": "http://ds9.lemmy.ml/post/1",
  "audience": "https://enterprise.lemmy.ml/c/tenforward",
  "type": "Dislike",
  "id": "http://enterprise.lemmy.ml/activities/dislike/64d40d40-a829-43a5-8247-1fb595b3ca1c"
}
Undo Like or Dislike Post or Comment
Revert a vote that was previously done by the same user.
{
  "actor": "http://ds9.lemmy.ml/u/lemmy_alpha",
  "object": {
    "actor": "http://ds9.lemmy.ml/u/lemmy_alpha",
    "object": "http://ds9.lemmy.ml/comment/1",
    "audience": "https://enterprise.lemmy.ml/c/tenforward",
    "type": "Like",
    "id": "http://ds9.lemmy.ml/activities/like/efcf7ae2-dfcc-4ff4-9ce4-6adf251ff004"
  },
  "audience": "https://enterprise.lemmy.ml/c/tenforward",
  "type": "Undo",
  "id": "http://ds9.lemmy.ml/activities/undo/3518565c-24a7-4d9e-8e0a-f7a2f45ac618"
}
Delete Post or Comment
Mods can remove Posts and Comments from their Communities. Admins can remove any Posts or Comments on the entire site. Communities can also be removed by admins. The item is then hidden from all users.
Removals are sent to all followers of the Community, so that they also take effect there. The exception is if an admin removes an item from a Community which is hosted on a different instance. In this case, the removal only takes effect locally.
{
  "actor": "http://ds9.lemmy.ml/u/lemmy_alpha",
  "to": ["https://www.w3.org/ns/activitystreams#Public"],
  "object": "http://ds9.lemmy.ml/post/1",
  "cc": ["http://enterprise.lemmy.ml/c/main"],
  "audience": "http://enterprise.lemmy.ml/u/main",
  "type": "Delete",
  "id": "http://ds9.lemmy.ml/activities/delete/f2abee48-c7bb-41d5-9e27-8775ff32db12"
}
Undo Delete
Post or comment deletions can be reverted by the same user.
{
  "actor": "http://ds9.lemmy.ml/u/lemmy_alpha",
  "to": ["https://www.w3.org/ns/activitystreams#Public"],
  "object": {
    "actor": "http://ds9.lemmy.ml/u/lemmy_alpha",
    "to": ["https://www.w3.org/ns/activitystreams#Public"],
    "object": "http://ds9.lemmy.ml/post/1",
    "cc": ["http://enterprise.lemmy.ml/c/main"],
    "audience": "http://enterprise.lemmy.ml/u/main",
    "type": "Delete",
    "id": "http://ds9.lemmy.ml/activities/delete/b13cca96-7737-41e1-9769-8fbf972b3509"
  },
  "cc": ["http://enterprise.lemmy.ml/c/main"],
  "audience": "http://enterprise.lemmy.ml/u/main",
  "type": "Undo",
  "id": "http://ds9.lemmy.ml/activities/undo/5e939cfb-b8a1-4de8-950f-9d684e9162b9"
}
Report Post, comment or private message
Reports content for rule violation, so that mods/admins can review it.
{
  "actor": "http://ds9.lemmy.ml/u/lemmy_alpha",
  "to": ["http://enterprise.lemmy.ml/c/main"],
  "audience": "http://enterprise.lemmy.ml/u/main",
  "object": "http://enterprise.lemmy.ml/post/7",
  "summary": "report this post",
  "type": "Flag",
  "id": "http://ds9.lemmy.ml/activities/flag/98b0933f-5e45-4a95-a15f-e0dc86361ba4"
}
Delete User
Sent when a user deletes his own account.
{
  "actor": "http://ds9.lemmy.ml/u/lemmy_alpha",
  "to": ["https://www.w3.org/ns/activitystreams#Public"],
  "object": "http://ds9.lemmy.ml/u/lemmy_alpha",
  "type": "Delete",
  "id": "http://ds9.lemmy.ml/activities/delete/f2abee48-c7bb-41d5-9e27-8775ff32db12",
  "removeData": true
}
Community to User
Accept Follow
Automatically sent by the community in response to a Follow. At the same time, the community adds this user to its followers list.
{
  "actor": "http://enterprise.lemmy.ml/c/main",
  "to": ["http://ds9.lemmy.ml/u/lemmy_alpha"],
  "object": {
    "actor": "http://ds9.lemmy.ml/u/lemmy_alpha",
    "to": ["http://enterprise.lemmy.ml/c/main"],
    "object": "http://enterprise.lemmy.ml/c/main",
    "type": "Follow",
    "id": "http://ds9.lemmy.ml/activities/follow/6abcd50b-b8ca-4952-86b0-a6dd8cc12866"
  },
  "type": "Accept",
  "id": "http://enterprise.lemmy.ml/activities/accept/75f080cc-3d45-4654-8186-8f3bb853fa27"
}
Announce
If the Community receives any Post or Comment related activity (Create, Update, Like, Dislike, Remove, Delete, Undo etc.), it will forward this to its followers. For this, an Announce is created with the Community as actor, and the received activity as object. This is sent to all followers, so they get updated in real time.
{
  "actor": "http://enterprise.lemmy.ml/c/main",
  "to": ["https://www.w3.org/ns/activitystreams#Public"],
  "object": {
    "actor": "http://enterprise.lemmy.ml/u/lemmy_beta",
    "to": ["https://www.w3.org/ns/activitystreams#Public"],
    "object": {
      "type": "Page",
      "id": "http://enterprise.lemmy.ml/post/7",
      "attributedTo": "http://enterprise.lemmy.ml/u/lemmy_beta",
      "to": [
        "http://enterprise.lemmy.ml/c/main",
        "https://www.w3.org/ns/activitystreams#Public"
      ],
      "name": "post 4",
      "mediaType": "text/html",
      "commentsEnabled": true,
      "sensitive": false,
      "stickied": false,
      "published": "2021-11-01T12:11:22.871846Z"
    },
    "cc": ["http://enterprise.lemmy.ml/c/main"],
    "type": "Create",
    "id": "http://enterprise.lemmy.ml/activities/create/2807c9ec-3ad8-4859-a9e0-28b59b6e499f"
  },
  "cc": ["http://enterprise.lemmy.ml/c/main/followers"],
  "type": "Announce",
  "id": "http://enterprise.lemmy.ml/activities/announce/8030b171-803a-4108-94b1-342688f375cf"
}
Moderation
These actions can only be done by instance admins or community moderators. They are sent to the community and announced by it. See for a general overview how moderation works in Lemmy. Communities can only be created on the same instance where a user is registered. After that, mods from other instances can be added with Add/User activity.
Remove Post or Comment
Removes a post or comment. The difference to delete is that remove activities have a summary field, which contains the reason for removal, as provided by the mod/admin.
{
  "actor": "http://enterprise.lemmy.ml/u/lemmy_beta",
  "to": ["https://www.w3.org/ns/activitystreams#Public"],
  "object": "http://ds9.lemmy.ml/comment/1",
  "cc": ["http://enterprise.lemmy.ml/c/main"],
  "audience": "http://enterprise.lemmy.ml/u/main",
  "type": "Delete",
  "summary": "bad comment",
  "id": "http://enterprise.lemmy.ml/activities/delete/42ca1a79-f99e-4518-a2ca-ba2df221eb5e"
}
Block User
Blocks a user so he can’t participate anymore. The scope is determined by the target field: either a community, or a whole instance. The removeData field can optionally be set to indicate that all previous posts of the user should be deleted.
{
  "actor": "http://enterprise.lemmy.ml/u/lemmy_beta",
  "to": ["https://www.w3.org/ns/activitystreams#Public"],
  "object": "http://ds9.lemmy.ml/u/lemmy_alpha",
  "cc": ["http://enterprise.lemmy.ml/c/main"],
  "audience": "http://enterprise.lemmy.ml/u/main",
  "target": "http://enterprise.lemmy.ml/c/main",
  "type": "Block",
  "removeData": true,
  "summary": "spam post",
  "expires": "2021-11-01T12:23:50.151874Z",
  "id": "http://enterprise.lemmy.ml/activities/block/5d42fffb-0903-4625-86d4-0b39bb344fc2"
}
Lock post
Posts can be locked so that no new comments can be created.
{
  "id": "http://lemmy-alpha:8541/activities/lock/cb48761d-9e8c-42ce-aacb-b4bbe6408db2",
  "actor": "http://lemmy-alpha:8541/u/lemmy_alpha",
  "to": ["https://www.w3.org/ns/activitystreams#Public"],
  "object": "http://lemmy-alpha:8541/post/2",
  "cc": ["http://lemmy-alpha:8541/c/main"],
  "type": "Lock",
  "audience": "http://lemmy-alpha:8541/c/main"
}
Undo mod actions
All previously listed mod actions can be reverted by wrapping the original activity in Undo. Note that Lemmy regenerates the inner activity with a new ID.
{
  "actor": "http://enterprise.lemmy.ml/u/lemmy_beta",
  "to": ["https://www.w3.org/ns/activitystreams#Public"],
  "object": {
    "actor": "http://enterprise.lemmy.ml/u/lemmy_beta",
    "to": ["https://www.w3.org/ns/activitystreams#Public"],
    "object": "http://ds9.lemmy.ml/comment/1",
    "cc": ["http://enterprise.lemmy.ml/c/main"],
    "audience": "http://enterprise.lemmy.ml/u/main",
    "type": "Delete",
    "summary": "bad comment",
    "id": "http://enterprise.lemmy.ml/activities/delete/2598435c-87a3-49cd-81f3-a44b03b7af9d"
  },
  "cc": ["http://enterprise.lemmy.ml/c/main"],
  "audience": "http://enterprise.lemmy.ml/u/main",
  "type": "Undo",
  "id": "http://enterprise.lemmy.ml/activities/undo/a850cf21-3866-4b3a-b80b-56aa00997fee"
}
{
  "actor": "http://enterprise.lemmy.ml/u/lemmy_beta",
  "to": ["https://www.w3.org/ns/activitystreams#Public"],
  "object": {
    "actor": "http://enterprise.lemmy.ml/u/lemmy_beta",
    "to": ["https://www.w3.org/ns/activitystreams#Public"],
    "object": "http://ds9.lemmy.ml/u/lemmy_alpha",
    "cc": ["http://enterprise.lemmy.ml/c/main"],
    "audience": "http://enterprise.lemmy.ml/u/main",
    "target": "http://enterprise.lemmy.ml/c/main",
    "type": "Block",
    "removeData": true,
    "summary": "spam post",
    "expires": "2021-11-01T12:23:50.151874Z",
    "id": "http://enterprise.lemmy.ml/activities/block/726f43ab-bd0e-4ab3-89c8-627e976f553c"
  },
  "cc": ["http://enterprise.lemmy.ml/c/main"],
  "audience": "http://enterprise.lemmy.ml/u/main",
  "type": "Undo",
  "id": "http://enterprise.lemmy.ml/activities/undo/06a20ffb-3e32-42fb-8f4c-674b36d7c557"
}
Add or remove featured post
Posts can be pinned so that they are always shown on top of the community. This is federated with the Community featured posts collection.
{
  "cc": ["https://ds9.lemmy.ml/c/main"],
  "id": "https://ds9.lemmy.ml/activities/add/47d911f5-52c5-4659-b2fd-0e58c451a427",
  "to": ["https://www.w3.org/ns/activitystreams#Public"],
  "type": "Add",
  "actor": "https://ds9.lemmy.ml/u/lemmy_alpha",
  "object": "https://ds9.lemmy.ml/post/2",
  "target": "https://ds9.lemmy.ml/c/main/featured",
  "audience": "https://ds9.lemmy.ml/c/main"
}
{
  "cc": ["https://ds9.lemmy.ml/c/main"],
  "id": "https://ds9.lemmy.ml/activities/add/47d911f5-52c5-4659-b2fd-0e58c451a427",
  "to": ["https://www.w3.org/ns/activitystreams#Public"],
  "type": "Remove",
  "actor": "https://ds9.lemmy.ml/u/lemmy_alpha",
  "object": "https://ds9.lemmy.ml/post/2",
  "target": "https://ds9.lemmy.ml/c/main/featured",
  "audience": "https://ds9.lemmy.ml/c/main"
}
Add or remove mod
Add a new mod to the community. Has to be sent by an existing community mod, or an admin of the community’s instance.
{
  "actor": "http://enterprise.lemmy.ml/u/lemmy_beta",
  "to": ["https://www.w3.org/ns/activitystreams#Public"],
  "object": "http://ds9.lemmy.ml/u/lemmy_alpha",
  "target": "http://enterprise.lemmy.ml/c/main/moderators",
  "cc": ["http://enterprise.lemmy.ml/c/main"],
  "audience": "http://enterprise.lemmy.ml/u/main",
  "type": "Add",
  "id": "http://enterprise.lemmy.ml/activities/add/ec069147-77c3-447f-88c8-0ef1df10403f"
}
An existing mod can be removed in the same way.
{
  "actor": "http://enterprise.lemmy.ml/u/lemmy_beta",
  "to": ["https://www.w3.org/ns/activitystreams#Public"],
  "object": "http://ds9.lemmy.ml/u/lemmy_alpha",
  "cc": ["http://enterprise.lemmy.ml/c/main"],
  "type": "Remove",
  "target": "http://enterprise.lemmy.ml/c/main/moderators",
  "audience": "http://enterprise.lemmy.ml/u/main",
  "id": "http://enterprise.lemmy.ml/activities/remove/aab114f8-cfbd-4935-a5b7-e1a64603650d"
}
User to User
Follow a user
Users from other platforms can follow Lemmy users and receive all of their posts to the inbox. Note that users who are registered on Lemmy can only follow groups, not other users.
{
  "@context": [
    "https://www.w3.org/ns/activitystreams",
    "https://mycrowd.ca/schemas/litepub-0.1.jsonld",
    {
      "@language": "und"
    }
  ],
  "actor": "https://mycrowd.ca/users/kinetix",
  "cc": [],
  "id": "https://mycrowd.ca/activities/dab6a4d3-0db0-41ee-8aab-7bfa4929b4fd",
  "object": "https://lemmy.ca/u/kinetix",
  "state": "pending",
  "to": ["https://lemmy.ca/u/kinetix"],
  "type": "Follow"
}
Create or Update Private message
User profiles have a “Send Message” button, which opens a dialog permitting to send a private message to this user. It is sent as a Create/ChatMessage to the user inbox. Private messages can only be directed at a single User. They can also be edited with Update/ChatMessage.
{
  "id": "http://enterprise.lemmy.ml/activities/create/987d05fa-f637-46d7-85be-13d112bc269f",
  "actor": "http://enterprise.lemmy.ml/u/lemmy_beta",
  "to": ["http://ds9.lemmy.ml/u/lemmy_alpha"],
  "object": {
    "type": "ChatMessage",
    "id": "http://enterprise.lemmy.ml/private_message/1",
    "attributedTo": "http://enterprise.lemmy.ml/u/lemmy_beta",
    "to": ["http://ds9.lemmy.ml/u/lemmy_alpha"],
    "content": "hello",
    "mediaType": "text/html",
    "source": {
      "content": "hello",
      "mediaType": "text/markdown"
    },
    "published": "2021-10-29T15:31:56.058289Z"
  },
  "type": "Create"
}
Delete Private Message
Deletes a previous private message.
{
  "actor": "http://enterprise.lemmy.ml/u/lemmy_beta",
  "to": ["http://enterprise.lemmy.ml/u/lemmy_beta"],
  "object": "http://enterprise.lemmy.ml/private_message/1",
  "type": "Delete",
  "id": "http://enterprise.lemmy.ml/activities/delete/041d9858-5eef-4ad9-84ae-7455b4d87ed9"
}
Undo Delete Private Message
Restores a previously deleted private message. The object is regenerated from scratch, as such the activity ID and other fields are different.
{
  "actor": "http://enterprise.lemmy.ml/u/lemmy_beta",
  "to": ["http://ds9.lemmy.ml/u/lemmy_alpha"],
  "object": {
    "actor": "http://enterprise.lemmy.ml/u/lemmy_beta",
    "to": ["http://enterprise.lemmy.ml/u/lemmy_beta"],
    "object": "http://enterprise.lemmy.ml/private_message/1",
    "type": "Delete",
    "id": "http://enterprise.lemmy.ml/activities/delete/616c41be-04ed-4bd4-b865-30712186b122"
  },
  "type": "Undo",
  "id": "http://enterprise.lemmy.ml/activities/undo/35e5b337-014c-4bbe-8d63-6fac96f51409"
}
Resources
Rust
Typescript
Trees
Sorting
SQL
ActivityPub Resources
Official Documents
Explanations
- ActivityPub - one protocol to rule them all?
- A highly opinionated guide to learning about ActivityPub
- Activitypub implementers guide
- Mastodon Blog: How to implement a basic ActivityPub server
- Mastodon Blog: Implementing an ActivityPub inbox
- Data storage questions
- Activitypub as it has been understood
Examples and Libraries
- activitypub-federation-rust library
- ActivityPub example server
- ActivityStreams crate
- HTTP Signatures crate
Ranking Algorithm
Goals
- During the day, new posts and comments should be near the top, so they can be voted on.
- After a day or so, the time factor should go away.
- Use a log scale, since votes tend to snowball, and so the first 10 votes are just as important as the next hundred.
Implementations
Does not take the lifetime of the thread into account, giving early comments an overwhelming advantage over later ones, with the effect being even worse in small communities. New comments pool at the bottom of the thread, effectively killing off discussion and making each thread a race to comment early. This lowers the quality of conversation and rewards comments that are repetitive and spammy.
Hacker News
While far superior to Reddit’s implementation for its decay of scores over time, Hacker News’ ranking algorithm does not use a logarithmic scale for scores.
Lemmy
Counterbalances the snowballing effect of votes over time with a logarithmic scale. Negates the inherent advantage of early comments while still ensuring that votes still matter in the long-term, not nuking older popular comments.
Rank = ScaleFactor * log(Max(1, 3 + Score)) / (Time + 2)^Gravity
Scaled_Rank = Rank / log(2 + Users_Active_Month)

Score = Upvotes - Downvotes
Time = time since submission (in hours)
Gravity = Decay gravity, 1.8 is default
Users_Active_Month = The number of users in a given community who have posted / commented / voted in the last month.
- Lemmy uses the same
Rankalgorithm above, in three sorts:Active,Hot, andScaled.Activeuses the post votes, and latest comment time (limited to two days).Hotuses the post votes, and the post published time.Scaledis similar toHot, but gives a boost to smaller / less active communities.
- Use Max(1, score) to make sure all comments are affected by time decay.
- Add 3 to the score, so that everything that has less than 3 downvotes will seem new. Otherwise all new comments would stay at zero, near the bottom.
- The sign and abs of the score are necessary for dealing with the log of negative scores.
- A scale factor of 10k gets the rank in integer form.
A plot of rank over 24 hours, of scores of 1, 5, 10, 100, 1000, with a scale factor of 10k.
![]()
Active User counts
Lemmy also shows counts of active users for your site, and its communities. These are counted within the last day, week, month, and half year, and are cached on starting up lemmy, and every hour.
An active user is someone who has posted, commented, or voted on our instance or community within the last given time frame. For site counts, only local users are counted. For community counts, federated users are included.
Lemmy Plugins
Plugin support will be added in the upcoming 1.0 release. You can already start developing plugins now.
Follow these steps:
- Follow the normal setup instructions, using
:nightlytags to get the latest development version. - Specify plugins in
lemmy.hjson(docs):
plugins: [{
  file: "https://github.com/LemmyNet/lemmy-plugins/releases/download/0.1.3/rust_lingua.wasm",
  hash: "e1f58029f2ecca5127a4584609494120683b691fc63a543979ea071f32cf690f",
  allowed_hosts: ["0.0.0.0"]
}]
- You can skip the hash check by setting the env var
DANGER_PLUGIN_SKIP_HASH_CHECK.
Plugins are implemented using Extism and Webassembly. They can be written in any language that compiles to Wasm. Checkout the documentation for general development instructions.
The lemmy-plugins repo contains various example plugins written in different languages.
API before hooks
These are called before a given API endpoint is invoked, with the raw JSON data submitted by the user, and need to return data in the same format. Useful for moderation bots which can alter or reject posts.
Examples:
local_post_before_createwith data CreatePostlocal_comment_before_updatewith data EditCommentfederated_post_before_receivewith PostInsertForm- Search the code for
plugin_hook_beforeto find all available hooks
API after hooks
Called after an endpoint was successfully invoked and gets passed the API return data. Useful for notifications.
Examples:
local_post_after_createwith data CreatePostlocal_comment_after_updatewith data EditCommentfederated_post_after_receivewith Post- Search the code for
plugin_hook_beforeto find all available hooks
Captcha Plugin
get_captchagenerates a new captcha, returns CaptchaResponsevalidate_captchatakes CaptchaAnswer and should return error if the answer is wrong
Code of Conduct
- We are committed to providing a friendly, safe and welcoming environment for all, regardless of level of experience, gender identity and expression, sexual orientation, disability, personal appearance, body size, race, ethnicity, age, religion, nationality, or other similar characteristic.
- Use of so-called Artificial Intelligence (AI) is allowed only if it is explicitly mentioned. Additionally all LLM-generated text or code must be manually reviewed by the author before submission (no vibe coding allowed).
- Please avoid using overtly sexual aliases or other nicknames that might detract from a friendly, safe and welcoming environment for all.
- Please be kind and courteous. There’s no need to be mean or rude.
- Respect that people have differences of opinion and that every design or implementation choice carries a trade-off and numerous costs. There is seldom a right answer.
- Please keep unstructured critique to a minimum. If you have solid ideas you want to experiment with, make a fork and see how it works.
- We will exclude you from interaction if you insult, demean or harass anyone. That is not welcome behavior. We interpret the term “harassment” as including the definition in the Citizen Code of Conduct; if you have any lack of clarity about what might be included in that concept, please read their definition. In particular, we don’t tolerate behavior that excludes people in socially marginalized groups.
- Private harassment is also unacceptable. No matter who you are, if you feel you have been or are being harassed or made uncomfortable by a community member, please contact one of the channel ops or any of the Lemmy moderation team immediately. Whether you’re a regular contributor or a newcomer, we care about making this community a safe place for you and we’ve got your back.
- Likewise any spamming, trolling, flaming, baiting or other attention-stealing behavior is not welcome.
- Entitlement, ie demanding or insulting behavior towards someone for not doing what you want them to do, or not doing it fast enough, will also not be tolerated.
Message the Moderation Team on Mastodon
Moderation
These are the policies for upholding our community’s standards of conduct. If you feel that a thread needs moderation, please contact the Lemmy moderation team .
- Remarks that violate the Lemmy standards of conduct, including hateful, hurtful, oppressive, or exclusionary remarks, are not allowed. (Cursing is allowed, but never targeting another user, and never in a hateful manner.)
- Remarks that moderators find inappropriate, whether listed in the code of conduct or not, are also not allowed.
- Moderators will first respond to such remarks with a warning, at the same time the offending content will likely be removed whenever possible.
- If the warning is unheeded, the user will be “kicked,” i.e., kicked out of the communication channel to cool off.
- If the user comes back and continues to make trouble, they will be banned, i.e., indefinitely excluded.
- Moderators may choose at their discretion to un-ban the user if it was a first offense and they offer the offended party a genuine apology.
- If a moderator bans someone and you think it was unjustified, please take it up with that moderator, or with a different moderator, in private. Complaints about bans in-channel are not allowed.
- Moderators are held to a higher standard than other community members. If a moderator creates an inappropriate situation, they should expect less leeway than others.
In the Lemmy community we strive to go the extra step to look out for each other. Don’t just aim to be technically unimpeachable, try to be your best self. In particular, avoid flirting with offensive or sensitive issues, particularly if they’re off-topic; this all too often leads to unnecessary fights, hurt feelings, and damaged trust; worse, it can drive people away from the community entirely.
And if someone takes issue with something you said or did, resist the urge to be defensive. Just stop doing what it was they complained about and apologize. Even if you feel you were misinterpreted or unfairly accused, chances are good there was something you could’ve communicated better — remember that it’s your responsibility to make others comfortable. Everyone wants to get along and we are all here first and foremost because we want to talk about cool technology. You will find that people will be eager to assume good intent and forgive as long as you earn their trust.
The enforcement policies listed above apply to all official Lemmy venues; including git repositories under github.com/LemmyNet and git.join-lemmy.org/LemmyNet, the Matrix chat; lemmy.ml and other instances under that domain. For other projects adopting the Lemmy Code of Conduct, please contact the maintainers of those projects for enforcement. If you wish to use this code of conduct for your own project, consider explicitly mentioning your moderation policy or making a copy with your own moderation policy so as to avoid confusion.
Adapted from the Rust Code of Conduct, which is based on the Node.js Policy on Trolling as well as the Contributor Covenant v1.3.0.